

If you've ever wanted to create something warm, beautiful, and full of heart, you've landed in the right spot. The classic granny square is the perfect first project for any beginner: it’s small, incredibly satisfying, and teaches you all the foundational skills you'll need for years to come.
Think of this crochet granny square tutorial as your friendly guide. We’ll walk you through every loop and stitch, so you'll feel confident and joyful from start to finish.
Your Journey Into the Art of Granny Squares
Welcome to the wonderfully cozy world of granny squares! This timeless pattern is more than just a simple block of crochet; it's a rite of passage for newcomers and a comforting classic for seasoned crafters. It's a beautiful way to practice mindful crafting, turning simple yarn into a piece of art filled with love and connection.
Let's approach this like a warm chat with a friend who’s excited to share the joy of creating something beautiful with you. We'll start with the absolute basics, so don't worry if you're feeling a bit intimidated. There's a reason this project is so famously beginner-friendly.
Why Start with a Granny Square?
The granny square is celebrated as the ideal first project because it cleverly bundles several key crochet skills into one manageable little package. It's a small project with a big reward, helping you build confidence with every round.
As you work through your first square, you'll learn to:
- Master foundational stitches like the chain, slip stitch, and double crochet.
- Work in the round, a core skill you'll need for projects like hats and amigurumi.
- Understand pattern repetition, which helps you build a natural, meditative rhythm.
- Practice consistent tension, the secret to creating neat, even fabric.
This simple square truly is a building block for endless creativity. It’s your first step toward making blankets, bags, garments, and so much more.
A Timeless Craft with a Rich History
While it feels like a timeless piece of folk art, the granny square has a documented history stretching back to the late 19th century. The earliest known example actually appeared in an 1885 edition of Prairie Farmer magazine, where it was called a 'Crazy Afghan.'
This design mirrored the popular 'crazy quilt' trend of the era, where scraps of fabric were stitched together in a beautiful, chaotic harmony. You can dive deeper into the fascinating history of this iconic motif to see just how it has evolved over the decades.
Before you get tangled up in yarn, it's a great idea to set up an organized space. You can find some essential tips for organizing your crafting space to help keep your tools tidy, making your craft time that much more peaceful and fun.
Choosing Your First Crochet Hook and Yarn
Before you even think about making your first stitch, let's get your supplies in order. Picking the right hook and yarn is a genuinely fun part of the process, and making good choices now can set you up for a smooth, happy crafting session.
Think of it like gathering ingredients for a favorite recipe—the right tools make all the difference.
First up is your crochet hook. For a classic granny square, you can't go wrong with a size H-8 (5mm) or G-6 (4mm) hook. These mid-range sizes are a great choice because they're comfortable to hold and pair perfectly with common yarn weights, making it easier to see your stitches and learn the motions.
Hooks come in different materials, like slick aluminum or warm bamboo. Many beginners love ergonomic hooks with soft, cushioned grips. They can reduce hand cramps, letting you crochet comfortably for longer and get lost in the mindful rhythm of your stitches.
Finding the Perfect Yarn for Your Squares
Now for the best part: the yarn! The colors and textures you pick are what will give your granny squares their personality.
Don't get bogged down trying to find one "best" yarn. Instead, think about what you want to make. Are you dreaming of a cozy blanket, a breathable market bag, or a set of durable dishcloths? Your project's purpose is the best guide for choosing a fiber. You can learn more in our guide on choosing the perfect yarn for your crochet project.
Here’s a quick look at some popular yarn options to get you started:
- Cotton blends (DK/worsted weight): Breathable and easy to care for, making them a great choice for summer garments, dishcloths, and homeware.
- Acrylic (mostly worsted weight): A budget-friendly and machine-washable option, very common for blankets and everyday projects. Be aware it can sometimes pill or create static.
- Wool/wool blends: Wonderfully warm and elastic with great stitch recovery. Ideal for cozy hats and sweaters, but always check care instructions and consider skin sensitivity.
Ultimately, the right yarn is the one that brings you joy and makes you excited to start creating.
Don't Forget the Finishing Touches
Finally, you just need a couple of small but mighty tools to give your work that polished, professional look.
A good pair of small, sharp scissors is a must-have for clean yarn cuts. You’ll also need a yarn needle (sometimes called a tapestry needle) to weave in those pesky ends when you're all done. This final step is what makes your projects look neat, tidy, and secure enough to last.
Getting to Know the Foundational Stitches
Alright, this is where the real fun begins! We're about to take that yarn and hook and transform them into the building blocks of your first granny square. Don't worry about any technical-sounding stitch names. Just think of them as a few simple, rhythmic motions that you'll get the hang of in no time.
Every single crochet project, from a simple scarf to an elaborate blanket, is built from these same basic stitches. Once you get these down, you’ve learned the language of crochet. We'll walk through each one slowly, helping you build both confidence and muscle memory with every loop you make.
Starting Your Work: The Slip Knot and Chain
The very first thing you'll do in almost any crochet project is make a slip knot. This is just an adjustable loop that slides right onto your hook, getting you ready to start. It's a clever little knot that you can tighten or loosen easily.
After the slip knot, you’ll create your foundation using the chain stitch (ch). This is one of the most satisfying and simple movements in crochet. You just grab the yarn with your hook (we call this a "yarn over") and pull it through the loop already on your hook. That's it! Repeat that motion to form a neat little chain, which will be the base of your square.
An Actionable Tip: As you practice, try not to worry about making every stitch perfect. Focus on the gentle, gliding feel of the yarn over the hook. Your hands are learning a new dance, so be patient and let them find their rhythm.
Building Your Square: The Double Crochet and Slip Stitch
The stitch that gives the classic granny square its iconic look is the double crochet (dc). It's a bit taller than other basic stitches, which is why it works up so quickly and creates that lovely, slightly open texture. It involves yarning over before you put your hook into the chain, which helps form the beautiful clusters that define the granny square pattern.
Finally, we have the slip stitch (sl st). It’s a small but mighty stitch used to join things together. You’ll use a slip stitch to connect the ends of your starting chain to form a ring, and then again at the end of each round to finish it off seamlessly. Think of it as the invisible thread holding your work together.
If you'd like a closer look at any of these, our guide on basic crochet stitches for beginners has detailed photos and clear instructions to help you master each one.
Finding Your Comfortable Rhythm
As you practice these stitches, you’ll find a natural way to hold your hook and yarn. There’s no single "correct" method; some crocheters hold their hook like a pencil, while others prefer a knife-like grip. The goal is to find what feels good and doesn't strain your hands or wrists.
Another key skill that comes with practice is maintaining even tension. If your stitches are too tight, you'll struggle to get your hook through the loops. If they're too loose, your square might look a bit floppy. Just aim for smooth, consistent stitches. It can also be a huge help to see what you're doing clearly; many crafters find that using a good craft light with a magnifying glass reduces eye strain and helps them make more accurate stitches.
How to Crochet a Classic Granny Square
Alright, let's get those hooks moving and create your very first granny square. This is the fun part where all the stitches you’ve practiced finally come together to form that beautiful, classic design. We’ll walk through it round by round, so you can settle into the simple, meditative rhythm of the work.
Think of each round as a small win. We’ll start with the center ring and then build out our first round of “clusters”, which are really just little groups of double crochet stitches, separated by chains. It's a simple, repeatable pattern that’s incredibly satisfying to watch grow.
Starting Your Granny Square
Every single granny square starts with a simple loop. You'll make a small foundation ring that will act as the anchor for every stitch that follows.
From that little ring, you’ll work your first set of double crochet clusters right into the center. This first round is crucial because it establishes the four corners of your square, creating the framework for everything else. Don't stress about making it perfect; just focus on getting a feel for the flow of the yarn.
This process, starting a ring, working clusters into it, and joining the round, is the heart of every granny square. This infographic breaks down the basic flow for that first round.
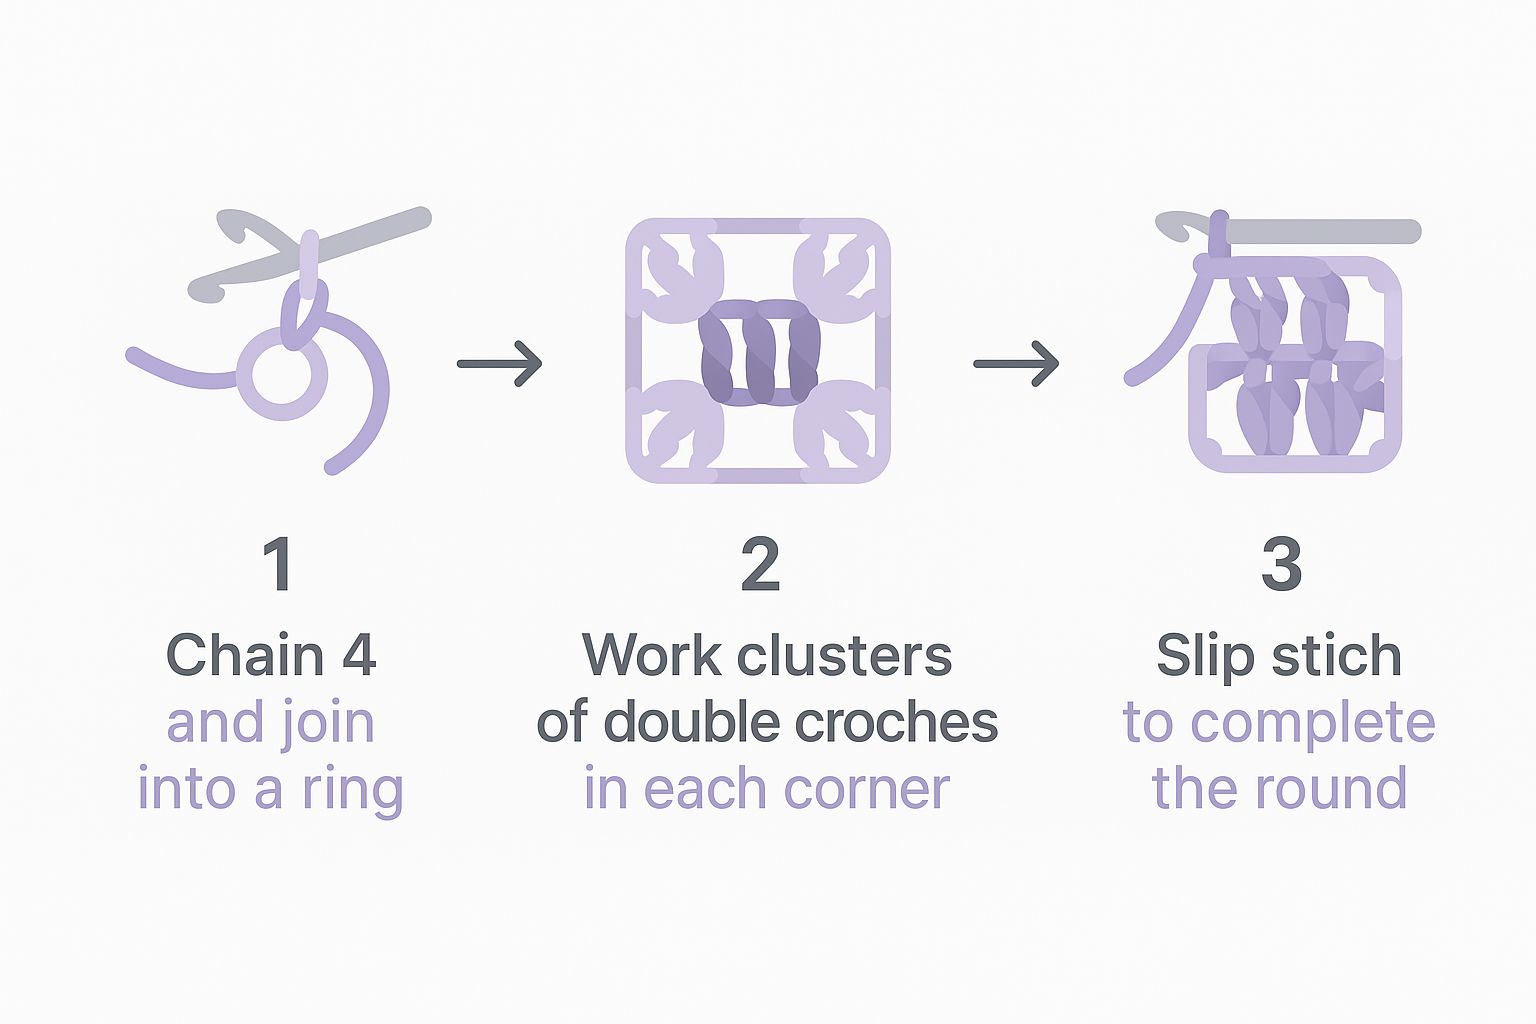
As you can see, it’s a wonderfully straightforward process. Each step flows right into the next, and before you know it, you'll have a complete round.
Building the Sides and Corners
Once that first round is done, the magic really begins. With each new round, your square will expand outward from the center. The trick is knowing exactly where to place your hook to get those nice, sharp corners and straight sides.
The corners are made by working a specific group of stitches, clusters separated by chains, into the corner spaces from the round below. The sides are formed by working single clusters into the spaces between those corners. This simple, repeating sequence is what gives the granny square its iconic look.
An Actionable Tip: To keep your corners sharp and your square flat, try to relax your tension. If you pull the yarn too tightly, especially on the chains in the corners, the square can start to pucker or curl. Let the stitches sit comfortably on your hook and breathe.
The sheer accessibility of this pattern is a huge part of why it's been loved for so long. During the global granny square trend of the 1970s, it became a massive hit in craft markets across the US, UK, and Australia. Its simple construction made it perfect for crafters of all skill levels, and that still holds true today.
Adding a Splash of Color
One of the best parts of making granny squares is playing with color. Changing colors is a simple technique, but it opens up a universe of creative possibilities, letting you design vibrant, one-of-a-kind projects. It’s also a fantastic way to use up leftover yarn scraps and turn them into something beautiful.
The ideal time to switch colors is right at the end of a round, just before you make that final slip stitch to join everything together.
- Work the last stitch of the round, but pause before the final pull-through.
- Drop your current color and pick up the new one.
- Use the new yarn to complete the slip stitch.
This little trick creates a nearly invisible transition, making your color changes look clean and professional. This technique transforms a simple square into a canvas for your creativity, whether you're making a solid-color classic or a multi-colored masterpiece.
Finishing Your Square and Fixing Common Mistakes
You did it! You’ve crocheted your first square, and that’s a huge milestone to celebrate. Now, let’s give it a polished, professional finish. This is the part that makes your work truly shine and last for years to come.
First, let's secure all that lovely stitching. After your final slip stitch, cut your yarn, leaving a tail about six inches long. Yarn over one last time and pull that tail completely through the loop on your hook. A gentle tug will cinch it down into a nice, secure knot.
Next comes the mindful act of weaving in the ends. Grab a yarn needle, thread that tail, and gently weave it through the backs of your stitches. This step not only makes your square look tidy but, more importantly, prevents it from unraveling later. If you want a deep dive, we cover this and more in our guide to essential crochet finishing techniques.
Troubleshooting Common Beginner Hurdles
It’s completely normal for your first few squares to have their own unique personality. Every single crocheter has been there! Let’s walk through a couple of common quirks and how to gently guide them back on track.
One common issue is a square that curls up or gets ruffly at the edges.
An Actionable Tip: Nine times out of ten, curling or ruffling comes down to stitch count. If you accidentally add too many stitches or chains in the corners, the edges get wavy. Too few, and the square will cup inward like a little bowl.
Don't panic! The fix is simple. Just take a deep breath and gently pull out that last round. (We call this "frogging" because you have to "rip-it, rip-it!"). Now, carefully recount the stitches in your clusters and the chains in your corners to make sure everything adds up correctly.
Another common sight is a square that looks more like a circle or an octagon. This is almost always a tension issue. If your chain spaces in the corners are too tight, they can't stretch enough to form that crisp, 90-degree angle.
- Relax Your Hands: Take a moment to consciously loosen your grip on the yarn and hook. You want the yarn to glide effortlessly through your fingers.
- Practice Your Gauge: Try to keep your stitches consistent in size. If some are noticeably tighter or looser than others, it can pull the shape out of whack.
Remember, these little challenges are part of the learning process. Each mistake is just a lesson in disguise, teaching you more about your own style and building the skills you’ll use on every beautiful project you make from now on.
Bringing Your Granny Squares to Life
Once you get the hang of this simple motif, you unlock a whole world of creative projects. Think of each granny square as a building block, a small victory on its way to becoming something truly wonderful and personal.
Just imagine stitching them all together. You could make a cozy blanket to snuggle under, a chic tote bag for market trips, or a vibrant set of pillows to brighten up your living room. The possibilities really are endless.
Joining Your Squares
When you have a nice little pile of finished squares, the real fun begins: joining them together. There are several ways to connect your work, and each method gives your final piece a completely different look and feel.
- Whip Stitch: A simple sewing technique that creates an almost invisible seam. This is a great choice for blankets where you want a smooth, flat surface.
- Single Crochet Join: If you’re looking for more texture, try crocheting your squares together. This technique creates a beautiful, raised seam that adds a decorative, grid-like pattern.
- Join-As-You-Go (JAYG): This method connects new squares as you’re crocheting the final round of each one, which means no seaming at the end. It's a fantastic time-saver!
The humble granny square has seen a massive revival, becoming a global favorite in the crafting community, as seen by its popularity on social media and crafting sites. Its adaptability is why it remains such a beloved starting point for new crafters.
What Will You Create Next?
Now it’s your turn to let your imagination run wild. By playing with different color combinations or trying a new joining method, you can transform the classic granny square into modern garments, charming accessories, or treasured family heirlooms. Each project is a new chance to pour a little bit of yourself into your craft.
Your hands have learned a beautiful new skill. Trust your creativity, celebrate every single stitch, and keep finding joy in the simple, rhythmic motion of crochet.
This journey is about more than just making things. It’s about creating moments of peace for yourself and filling your home with handmade warmth and love.
At Crochetree, we believe in the power of crafting to bring joy and connect us to one another. Explore our collection of beautiful yarns and tools to find inspiration for your next project. Start your next creative adventure with us today!


![The Ultimate Beginner's Guide to Crochet [2026]](http://crochetree.com/cdn/shop/articles/feat-ultimate-beginners-guide-to-crochet_eae81cec-84d0-455d-b190-08cd22d826c4.jpg?v=1777713815&width=533)


