

Learning how to to write crochet patterns is more than just jotting down steps. It’s about turning your creative spark into a clear, joyful roadmap that anyone can follow. Your journey begins by building a solid foundation: getting your materials, terms, and gauge just right, so fellow makers feel confident and supported from the very first stitch.
Building Your Pattern's Foundation
Think of this first section as the welcoming space for your pattern. Before anyone can start crocheting, they need to know what they're working with. Getting this part right isn't just a formality; it builds trust and prevents frustration, setting the stage for a wonderful crafting experience.
This is your chance to show you care. A clear, well-thought-out foundation shows you respect the maker's time and effort, turning a simple list of supplies into an encouraging start to a new project.
Essential Materials and Tools
This is often the first thing a crocheter scans to decide if they can dive into your project. Being thorough here is an act of kindness. A complete list means they can gather everything upfront without any surprise mid-project trips to the craft store.
Your list must include:
Yarn: Be specific and helpful! Mention the yarn weight (e.g., worsted, fingering), fiber, and the exact yardage or meters needed. Offering options helps makers choose what's right for them.
- Mercerized cotton (fingering): Smooth, durable, with crisp stitch definition; holds shape, ideal for amigurumi/detail work.
- Cotton blends (DK/worsted): Breathable and easy to care for, good for summer garments, dishcloths, and homeware.
- Acrylic (mostly worsted): Budget-friendly and machine-washable, common for blankets and everyday projects.
- Wool/wool blends: Warm and elastic with great stitch recovery, perfect for hats and sweaters, but check care instructions.
Crochet Hook: State the exact hook size you used to get the right gauge, such as 2.5 mm.
Notions: List every single other thing they'll need. Think yarn needles, stitch markers, scissors, stuffing, safety eyes, or buttons. Don't leave anything out!
A detailed materials list is your first promise to the maker: "I've thought of everything so you can relax and enjoy the process." It’s a small touch that makes a massive difference.
Defining Your Terms and Abbreviations
Crochet has its own beautiful language, and your pattern needs a mini-dictionary. Even if you're using common abbreviations, never assume everyone knows what they mean. A quick reference list at the start is a lifesaver.
Always, always specify whether you're using US or UK terminology. This is one of the biggest sources of confusion for crocheters. A simple note like, "This pattern is written in standard US crochet terms," works perfectly.
Here's a basic list to get you started:
ch – chain
sc – single crochet
inc – increase (e.g., "2 sc in the next stitch")
dec – decrease (e.g., "sc2tog")
sl st – slip stitch
st(s) – stitch(es)
Consistency is key to creating a smooth, flowing experience. If you call it a "magic ring" in the abbreviations, don't suddenly call it a "magic circle" in the instructions. This attention to detail makes your pattern feel polished and professional.
Explaining Gauge and Tension
Ah, gauge. It's easily the most skipped-over part of a pattern, but it's absolutely crucial for anything where size matters, like a sweater or a skirt. Think of gauge as your project's unique fingerprint, a result of your specific yarn, hook, and tension.
Your gauge section needs to clearly explain how to make and measure a test swatch. For instance: "10 sc x 10 rows = 2x2 inches (5x5 cm)." This gives the maker a benchmark to see if their stitches match yours. If they don't, the final piece could end up way too big or small.
For a deeper dive into this, check out our guide that explains everything about crochet hook sizes and gauge. Including this simple check is the best way to help someone end up with a finished object they can be proud of.
Mastering the Language of Crochet
The true heart of a great pattern lies in its clarity. Once you've sorted out the basic information, it’s time to nail the specific language that makes your instructions easy for anyone to follow. Think of it as a shared dialect that connects you with crocheters everywhere, ensuring your creative vision translates perfectly.
This language is built on standard abbreviations and consistent phrasing. When you get it right, a pattern feels like a friendly conversation, guiding the maker one stitch at a time. It’s this thoughtful communication that turns a good design into a project someone will truly cherish.
US vs UK Crochet Terms
One of the biggest tripping hazards in the crochet world is the difference between US and UK terminology. A "single crochet" (sc) in US terms is a "double crochet" (dc) in UK terms, a simple mix-up that can completely throw off a project!
To head off any confusion, always state which system you’re using right at the start of your pattern. A simple line like, "This pattern is written in standard US crochet terms," is all it takes. This small detail saves a ton of frustration and shows makers you’ve thought about their experience.
Writing Clear Instructions for Repeats
Most crochet patterns are built on repeating a sequence of stitches. The way you write these repeats can make the process either smooth and rhythmic or clunky and confusing. Your two best tools for this are asterisks (*) and parentheses ( ).
Using Asterisks (*): These are perfect for telling a crocheter to repeat a sequence multiple times across a row or round. For example: *sc, inc* repeat 6 times. This is so much cleaner than writing it out over and over.
Using Parentheses ( ): These can also be used for repetitions, the same way the asterisks, but they are best for grouping stitches that all go into the same stitch or space. For example: (sc, ch 2, sc) in next ch-sp. This tells the maker to work that whole little cluster together in one spot.
At the end of every single round or row, always include the total stitch count in brackets or parentheses, like [18] or (18 sts). This is a crucial checkpoint that lets the maker breathe a sigh of relief, knowing they’re on the right track before moving on. For a closer look at how all these pieces fit together, check out our guide on how to read a crochet pattern.
The Power of a Consistent Style
Consistency is your best friend when writing patterns. It builds a sense of trust and makes your designs instantly recognizable. When a maker picks up one of your patterns, they should feel a sense of calm familiarity, knowing exactly how you’ll explain things because you always do it the same way.
This consistency comes from using the standardized, text-based shorthand that has developed over the last 200 years to make crochet instructions understandable worldwide. This shared language helps us connect with makers no matter where they are.
Creating your own simple style sheet is a huge step toward professionalism. It’s your personal rulebook for pattern writing, ensuring every design you release has the same thoughtful, polished feel.
Creating Your Own Style Sheet
A style sheet doesn't have to be complicated. It's just a document where you decide how you’ll write common instructions and then stick to it. This little tool is a lifesaver for keeping your patterns cohesive and professional.
Here are a few things to jot down in your personal style sheet:
Terminology: Decide if you prefer "Magic Ring" or "Magic Circle." Pick one and make it your go-to.
Row-End Stitch Counts: Choose a format you like. Is it (30) or [30 sts]?
Color Changes: How will you write this out? A common method is: "…in the last stitch to this round, change to x color."
Special Stitches: When you create a unique stitch, write out the full instructions in a dedicated "Special Stitches" section. Then, you can simply refer to it by its abbreviation in the pattern rows.
Making this a habit not only helps you write patterns more efficiently but also seriously elevates the quality of your work. It shows your audience that you’re a thoughtful, reliable designer whose creative journeys they can trust.
Structuring Your Pattern for Ultimate Clarity
A well-organized pattern is a gift to a fellow maker. It’s the difference between a project that’s a joy to create and one that ends up as a tangled puzzle. Thoughtful structure creates a clear roadmap that guides the crocheter from start to finish, letting them relax and enjoy the mindful process of their craft.
This blueprint ensures every bit of information is right where the maker expects to find it. When a pattern flows logically, it builds confidence and lets the crocheter focus on the healing joy of making something with their own hands.
Crafting an Engaging Introduction
Your intro is your best chance to connect with the crocheter and share the story behind your design. This isn't just a formality, it's an invitation. Share a little bit about your inspiration. Was it a walk in the woods? A memory of a family craft time?
That personal touch helps the maker feel a real connection to the project. Your intro should also give a quick description of the finished item and its skill level, setting clear and gentle expectations from the get-go.
The All-Important Materials List
A clean, precise materials list is non-negotiable. It’s the first place a crocheter looks to see if they have what they need. Your job here is to eliminate all the guesswork so they can gather their supplies with total confidence.
Here’s how to break it down for them:
Yarn Specifics: Go beyond "worsted weight yarn." Name the fiber content, weight category, and exact yardage needed. For amigurumi, I often recommend a 100% mercerized cotton in fingering weight because its smooth texture and strength give amazing stitch definition and help the toy hold its shape beautifully.
Hook Size: State the exact hook size you used to get gauge (e.g., 2.55 mm). No ambiguity!
Essential Notions: List every other tool they'll need. Think yarn needles, stitch markers, sharp scissors, and anything project-specific like safety eyes or stuffing.
Anatomy of a Well-Structured Pattern
While every design has its own personality, a standard structure helps crocheters feel at home. This consistency builds trust and makes your patterns way more enjoyable to follow.
A predictable structure doesn't limit your creativity. It liberates the maker to focus on the joy of crocheting, confident that all the information they need is right where they expect it to be.
Here’s a simple, effective order that has become the gold standard for pattern sections:
- Introduction & Photos: Draw the maker in with beautiful photos and the story behind your design.
- Skill Level & Terminology: State the difficulty (e.g., Beginner) and whether you're using US or UK terms.
- Materials & Tools: A complete list of everything needed.
- Gauge: Clear instructions for the gauge swatch.
- Finished Size: The expected dimensions of the final piece.
- Abbreviations List: Your pattern's helpful dictionary.
- Special Stitch Instructions: Detailed explanations for any unique stitches used.
- The Pattern Itself: The core row-by-row or round-by-round instructions.
- Assembly & Finishing: Guidance on sewing parts together and adding details.
- Copyright & Contact Info: A friendly note about how your pattern can be used.
When you follow this kind of blueprint, you're creating a seamless, supportive experience that honors the maker's time and celebrates the shared joy of bringing a beautiful idea to life.
The Crucial Role of Pattern Testing
You did it. You’ve poured your heart into a design, meticulously written everything down, and you’re buzzing with excitement to share it. But hold on for just a moment. Before you hit "publish," there's one more deeply collaborative and absolutely essential step: pattern testing.
This isn’t just about catching a few typos. It's a vital part of learning how to write crochet patterns that are genuinely joyful and frustration-free for your fellow makers.
Think of your testers as your creative partners. These are fellow crocheters who volunteer their time and skills to bring your vision to life, ensuring the journey is as beautiful as the finished object. This process builds your reputation as a thoughtful, reliable designer.
This handy visual breaks down the entire pattern-writing workflow. As you can see, the final review for clarity is where testing becomes the hero of the story.
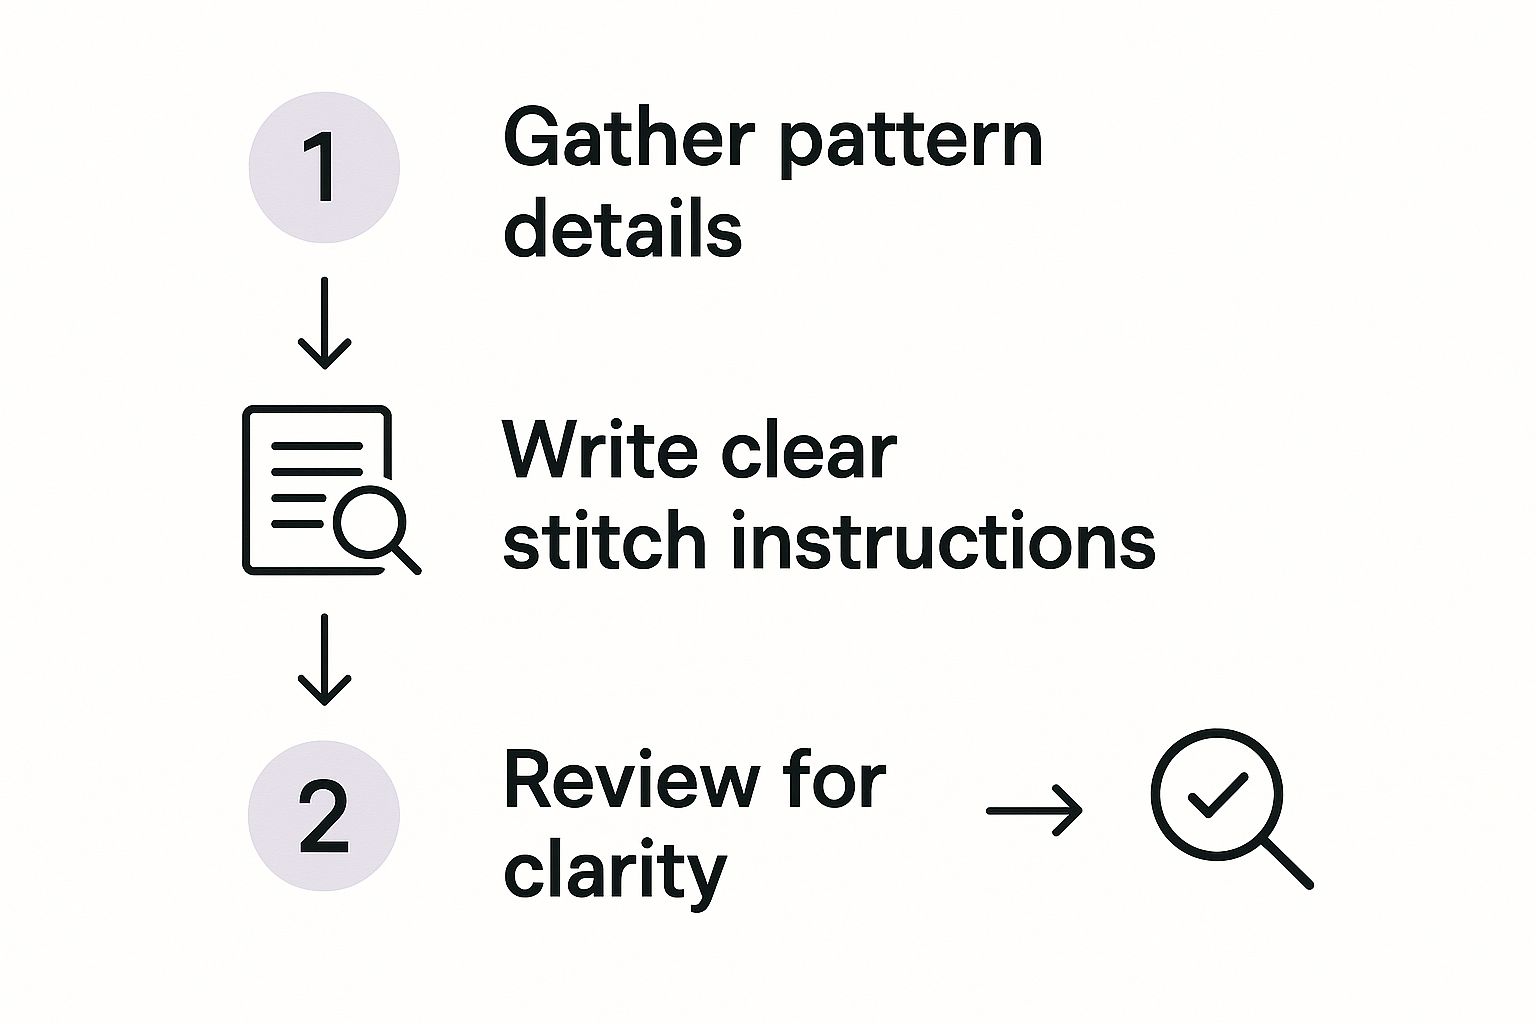
This final checkpoint ensures all your hard work pays off in a clear, easy-to-follow pattern that people will love to make.
Why You Can't Skip Testing
Pattern testers do so much more than proofread. They are your quality control team, looking at every part of the maker's experience from the first stitch to the last. A solid testing process confirms your instructions are not just correct, but clear and intuitive.
Here’s a glimpse of what your testers will verify:
Clarity: Is the language easy to understand? Are there any sections that felt confusing?
Stitch and Row Counts: Do the numbers at the end of each round actually add up? This is a super common hiccup!
Yardage Estimates: Did your yarn estimate hold up in the real world?
Final Dimensions: Does their finished piece match the size you intended?
Overall Experience: Was it a joyful process? Were there any tricky spots that could be explained better?
"Pattern testing is an act of community care. It's crocheters helping crocheters, ensuring that the creative process remains a source of joy and connection, not frustration."
Catching these potential snags beforehand is a gift to your future customers. It saves you from a flood of confused emails and protects your reputation as a designer who truly cares about the crafting experience.
Finding and Working with Testers
So, where do you find these amazing people? Social media is your best friend here. Platforms like Instagram, Facebook groups dedicated to crochet, and Ravelry are fantastic places to put out a "tester call."
When you post your call, be crystal clear about your expectations. Include photos of the design, the required skill level, the exact materials needed, and a firm deadline. Once you've picked your team, create a supportive space for them, like a group chat, where they can ask questions and share their progress.
Gathering Constructive Feedback
To get truly helpful feedback, give your testers a structured form to fill out. This isn't about being rigid; it's about gently guiding them on what to look for and making it easier for you to process all their valuable notes later. A good form asks specific questions about clarity, stitch counts, and any errors they spotted.
Remember to keep an open mind. Sometimes a tester will find a simpler way to phrase an instruction or a better technique for a certain section. Embrace this collaborative spirit! This feedback is invaluable for honing your pattern-writing skills.
Building a small, dedicated group of reliable testers is one of the best moves you can make on your design journey. They'll become your trusted creative partners, cheering you on as you grow.
Polishing and Publishing Your Pattern
You’ve done it! After all the sketching, stitching, and writing, you’re finally at the most exciting part. It's time to put the finishing touches on your pattern and send it out into the world for others to enjoy.
This last mile is where you transform a simple set of instructions into a beautiful, supportive, and professional crafting experience. These final details show respect for the crocheter's time and really reflect the heart you poured into your design from day one.
Capturing Your Creation with Photography
Long before a crafter reads a single word of your instructions, they’ll see your photos. Great photography is your single most powerful tool for grabbing their attention and showing off all the lovely details of your hard work. You don't need a fancy studio setup, either!
Natural light is your best friend. Find a spot near a window and shoot during the day to avoid harsh shadows and the yellow tint from indoor lighting. A simple, uncluttered background works wonders, so try using a plain wall or a nicely textured blanket to make your creation the star of the show.
Make sure to snap pictures from every angle, front, back, sides, and especially close-ups of any unique stitches or cool details. These shots give the maker a clear idea of what they are creating and help them appreciate the textures you’ve designed.
Designing a Beautiful and Readable Layout
The look and feel of your pattern document are just as crucial as the words inside it. A clean, organized, and inviting PDF makes the whole process feel more fun and way less intimidating, especially for someone just starting out.
You can create a gorgeous layout with simple tools. Many designers use programs like Google Docs or Microsoft Word with a basic template to keep their branding consistent. For more creative freedom, a tool like Canva has easy drag-and-drop features that let you design truly professional-looking PDFs.
Here are a few pointers for a knockout layout:
Choose a readable font: Stick with something clean and simple that's easy on the eyes.
Embrace white space: Don't cram everything together! Generous margins and spacing give the pattern a calm, approachable feel.
Add your branding: A simple logo and a consistent color scheme will make your work instantly recognizable.
Protecting Your Hard Work with Copyright
Adding a copyright statement is a simple but important step to protect your work. This doesn't need to sound intimidating. It’s just a clear, friendly way to let people know how they can and can’t use your pattern.
Your copyright notice can be short and sweet. Just be sure to include these key points:
- The copyright symbol (©), your name or business name, and the year.
- A sentence clarifying that the pattern itself cannot be sold or redistributed.
- Your policy on selling finished items. Many designers are happy to allow this, often just asking for a little credit for the design.
Your pattern is a piece of your creative story. A simple copyright notice honors the time and love you invested, ensuring your work is shared in the way you intended.
Common Questions About Writing Patterns
As you get ready to share your creative work, a few questions are bound to pop up. Don't worry, every single designer has asked these same things! Here are some straightforward answers to help you navigate the final steps with confidence.
How Should I Handle Sizing and Grading?
If you're designing something wearable like a sweater or hat, you'll need to "grade" it for multiple sizes. Grading is just the process of using standard body measurements and a bit of math to scale your original pattern up or down so it fits a range of bodies.
A great starting point is a standard sizing chart, like the ones from the Craft Yarn Council.
Remember that grading is both a science and an art. Don't be afraid to make a sleeve or a portion of another size just to double-check that your calculations are creating the shape and fit you envisioned.
What Should I Charge for My Pattern?
Pricing can feel tricky, but it doesn't have to be. A great way to start is by doing a little window shopping. Head over to platforms like Ravelry or Etsy and look at patterns similar to yours in complexity and project type.
Think about all the hours you've poured in, not just crocheting, but writing, photographing, formatting, and testing. Your price should reflect that hard work. Most digital crochet patterns fall somewhere between $5 and $12, with simple accessories on the lower end and complex garments on the higher end.
A few things to keep in mind:
Complexity: A simple washcloth pattern will be priced much lower than a detailed cardigan with multiple sizes.
Support: Does your pattern include extra resources like video tutorials or photo guides? These value-adds can justify a slightly higher price.
Platform Fees: Don't forget that selling platforms take a small cut of each sale, so be sure to factor that into your final price.
How Does Copyright Work for Crochet Patterns?
Copyright is a powerful tool that protects your creative work, and it's simpler than you might think. The written instructions, charts, and photos in your pattern are all legally protected the moment you create them. This means no one can legally copy, sell, or distribute your pattern without your permission.
It’s always a good idea to include a simple copyright statement at the end of your pattern.
This notice should include:
- The © symbol, your name (or business name), and the year it was published.
- A clear statement that the pattern itself cannot be sold or shared.
- Your policy on selling finished items. Many designers are happy to allow this, and often just ask for a shout-out or design credit.
This little block of text helps ensure your intellectual property is respected, honoring the love and effort you poured into creating something beautiful for the crochet community.


![The Ultimate Beginner's Guide to Crochet [2026]](http://crochetree.com/cdn/shop/articles/feat-ultimate-beginners-guide-to-crochet_eae81cec-84d0-455d-b190-08cd22d826c4.jpg?v=1777713815&width=533)


