
Learning how to crochet cluster stitch is a wonderful way to add beautiful texture and warmth to your projects. At its heart, a cluster stitch is a little family of incomplete stitches, like double crochets, worked into the same spot and then joined together at the top in one final, satisfying step. This creates a lovely, bumpy "cluster" that adds so much dimension and joy to your craft.
What Is the Crochet Cluster Stitch
Welcome to the cozy world of the cluster stitch! Think of it as a small group of stitches huddled together to create a single, beautiful puff. I know many beginners see the finished fabric and assume it’s complex, but it’s really just a repetition of a few easy, rhythmic motions.
This technique creates a wonderful, squishy texture that’s perfect for blankets, scarves, and hats. It's an incredibly satisfying stitch to learn, giving you that little spark of joy as you see each puff form under your hook. You'll love getting into the rhythm of it.
A Stitch with History
The cluster stitch isn’t just beautiful; it's part of a rich crafting tradition. As modern crochet took shape in 19th-century Europe, crafters were always looking for ways to create more intricate designs. Techniques like the cluster stitch allowed them to build dimensional effects that mimicked fancy lace or detailed motifs, making the craft so much more versatile. It's a piece of historical innovation that we still get to enjoy in countless contemporary patterns today.
Why You'll Love This Stitch
The cluster stitch stands out for a few key reasons, making it a favorite for both new and experienced crocheters. It’s a wonderful way to expand your creative toolkit and add a little something extra to your work.
Creates Amazing Texture: It makes a thick, squishy fabric that’s just perfect for warm and cozy projects. Think chunky blankets and winter hats!
Visually Impressive: The "puffs" look intricate and sophisticated, but they are surprisingly simple to create once you get the hang of the motion.
Builds Confidence: Mastering the cluster stitch feels like a real accomplishment. It's a great next step after learning the basics, helping you feel more capable and ready to tackle more advanced patterns.
The cluster stitch is one of many beautiful options out there. For a broader look at different techniques, check out our guide to the most common types of crochet stitches.
Choosing the Right Yarn and Hook
Before you make your first stitch, let's get your supplies together! The yarn and hook you choose will really make your cluster stitches pop and set the stage for a relaxing, joyful crafting session.
Different yarn fibers create completely different effects. A smooth cotton gives you crisp, well-defined puffs, while a soft wool results in a squishier, warmer fabric that feels incredibly cozy. It’s all about matching the material to the feeling you want your project to have.
A Quick Guide to Yarn Fibers
Thinking about your project's purpose is the best way to guide your yarn choice. Do you need something durable for a baby blanket, or are you craving something luxuriously soft for a scarf? Here are a few options to consider:
Mercerized cotton (fingering): Smooth, durable, and provides crisp stitch definition. It holds its shape well, making it ideal for amigurumi or projects with fine detail.
Cotton blends (DK/worsted): Breathable and easy to care for. A great choice for summer garments, dishcloths, and other homewares.
Acrylic (mostly worsted): Budget-friendly and machine-washable. It’s a common choice for blankets and everyday projects, though be aware it can sometimes pill or develop static.
Wool/wool blends: Very warm, elastic, and has great stitch recovery. Perfect for hats and sweaters, but always check care instructions and consider any skin sensitivities.
Chenille/faux-fur: Creates a plush, velvety texture for blankets and pillows, but the low stitch visibility makes it challenging for beginners.
Ultimately, the right choice is the one that brings you joy and fits what you’re making. Go ahead and feel the different textures—it's part of the fun!
Matching Your Hook to Your Yarn
Once you've picked your yarn, it's time to find its partner: the crochet hook. The yarn label will always suggest a hook size, which is a great place to start.
Here's an actionable tip you can try right away: for cluster stitches, consider going up a hook size from the recommendation. This can help keep the stitches from getting too tight and gives the fabric a little more drape and softness.
Getting this pairing right is the key to achieving even tension—the secret to uniform, beautiful clusters. If you’d like to explore this topic further, we have a detailed guide on how to choose the perfect crochet hook that's full of helpful advice. Making a small practice swatch before you begin is always a wonderful idea.
How to Crochet the Cluster Stitch
Alright, let's bring those beautiful clusters to life! We'll walk through the most common version, the 3-double-crochet cluster stitch (often abbreviated as 3dc-cl). Don't worry about the jargon; we’re going to focus on the simple, physical movements that build muscle memory one stitch at a time.
The real magic happens when you keep the final loop of each double crochet on your hook. Once you have them all lined up, you’ll pull your yarn through everything at once to “cluster” them together. It's a wonderfully rhythmic process that feels so satisfying once you get into the flow.
Breaking Down the Movements
Let's create one 3-double-crochet cluster together. Take your time, breathe, and remember that every stitch is a small victory. The goal is to feel the yarn and hook working in harmony, not to rush.
- First, yarn over and insert your hook into the designated stitch or space.
- Next, yarn over again and pull up a loop. You should now have three loops on your hook.
- Yarn over and pull through the first two loops only. You've just made one partial double crochet, leaving two loops on your hook.
- Repeat those steps two more times in the exact same stitch. After the second partial double crochet, you'll have three loops on your hook. After the third, you'll have four loops waiting patiently.
- Finally, yarn over one last time and pull through all four loops on your hook. And there you have it—your cluster is complete!
Actionable Tip: The secret is to stop before the final step of each double crochet. Think of it as gathering a small bouquet of loops before tying them all together with that last pull-through.
The infographic below shows how to set yourself up for success before you even begin the stitch. It's a great reminder that good preparation makes all the difference.
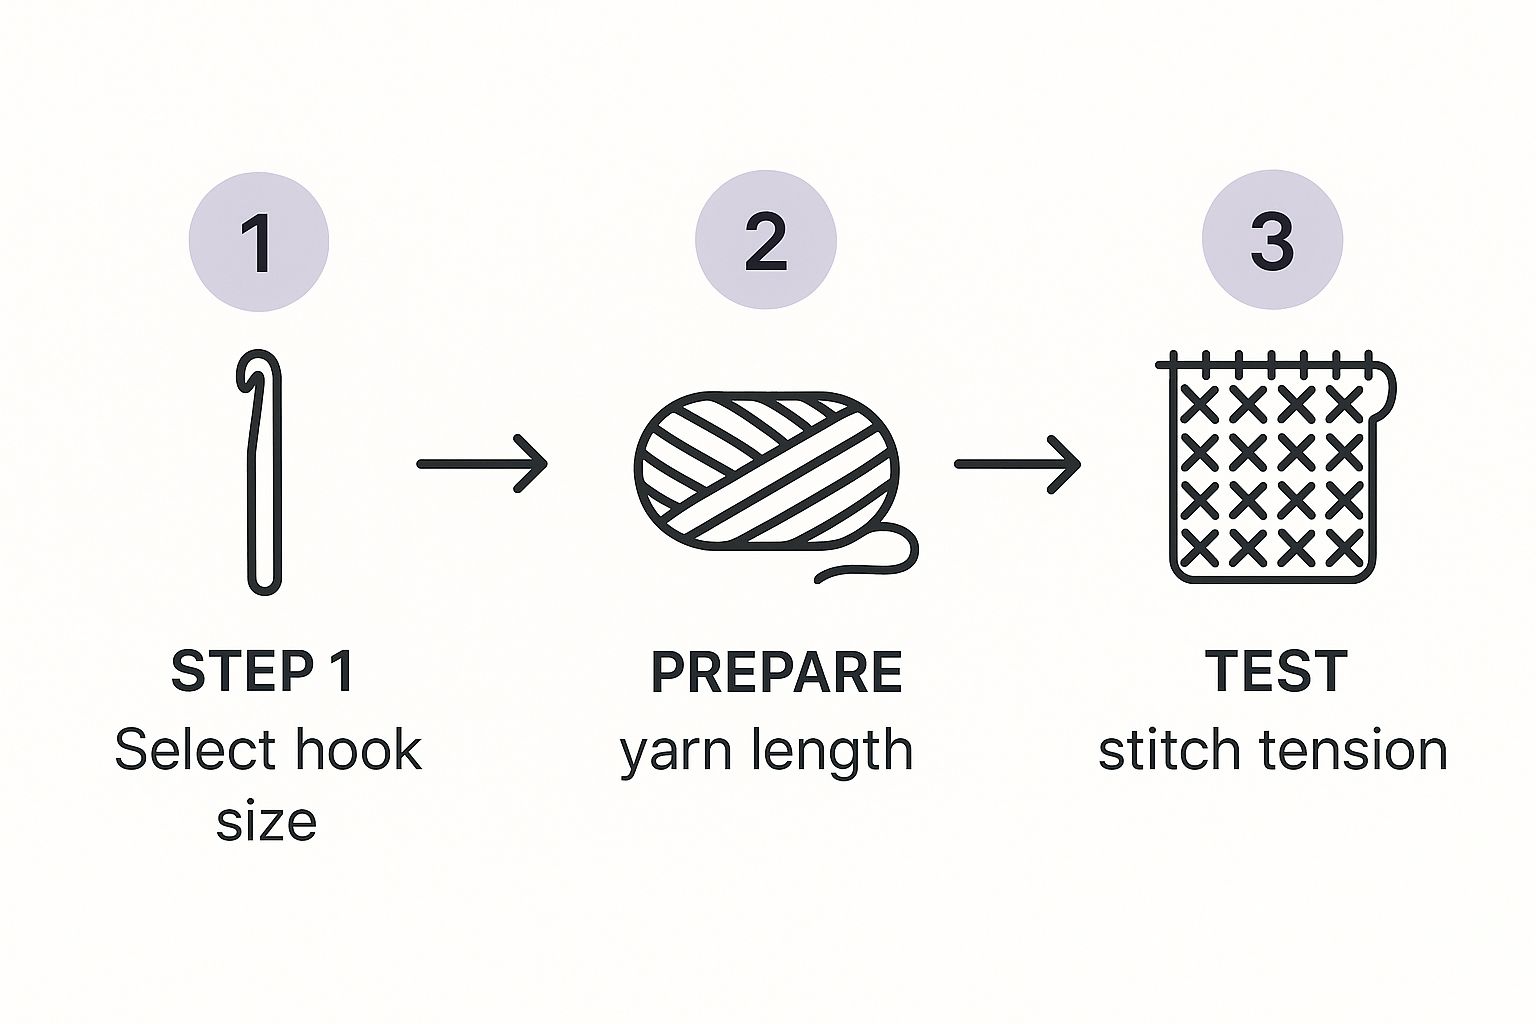
As the visual shows, a successful stitch starts with thoughtful preparation. Choosing the right tools and checking your tension are just as crucial as the stitch itself.
A Gateway to New Skills
The cluster stitch is a modern crafting staple because it adds gorgeous texture without being overly complicated. It’s a key milestone in any crafter's journey, building the confidence needed to move on to more complex techniques.
Tips for Making Perfect Clusters
Even the most seasoned crocheters hit a snag now and then, and that's completely okay! Think of these moments not as mistakes, but as opportunities to get to know your craft on a deeper level. Let's walk through a few common issues and turn any frustration into a moment of mastery.
One of the biggest hurdles with cluster stitches is keeping your tension even. You're aiming for all your clusters to look like a happy, uniform family. If some are tight little buds while others are loose and loopy, that’s your tension fluctuating, which is common when learning a new stitch.
Actionable Tip: A great way to find your rhythm is to crochet a small practice swatch before diving into your main project. This little warm-up lets your hands build muscle memory without the pressure of perfection.
Consistency Is Key
Achieving that lovely, consistent fabric really comes down to a few simple habits. By paying a little extra attention to how you hold your yarn and hook, you can create the beautiful, bumpy texture you’re aiming for.
Mind Your Loops: As you pull up the loops for each partial double crochet, try your best to make them all the same height. If some are short and others are tall, your finished clusters will end up looking a bit lopsided.
The Final Pull-Through: Go easy on that last step where you pull the yarn through all the loops on your hook. If you yank it too tight, the top of the cluster can pucker and shrink, which throws off the whole look.
If you find yourself struggling with this, don't worry. It’s a common challenge. We have some friendly advice for getting the hang of your crochet tension that offers more in-depth tips.
Avoiding Common Pitfalls
Another frequent slip-up is accidentally completing a double crochet too early instead of leaving that final loop on the hook. It happens! If you catch yourself doing it, just gently pull the stitch out and give it another go with a smile.
Using a stitch marker in the first and last cluster of a row can also be a lifesaver, especially when the edges start to look a bit fuzzy and it's hard to tell where your rows begin and end. Sometimes, the best fix is just to take a deep breath and slow down.
Exploring Different Cluster Stitch Variations
Once you get the hang of the basic cluster, a whole new world of texture opens up. This is where the real fun begins, letting you tweak the stitch to make a fabric that’s uniquely yours.
The simplest way to change things up is by adjusting how many partial stitches you group together. A delicate 2-dc cluster creates a subtle little bump, perfect for a lightweight baby blanket. On the flip side, a bold 5-dc cluster makes a dense, squishy puff that adds wonderful dimension to throw pillows or cozy hats.
Playing with Stitch Height
You can also experiment by changing the height of the stitches within the cluster itself. Using shorter stitches like half double crochets (hdc) will give you a small, tight puff. But if you switch to taller stitches like treble crochets (tr), you'll create a much longer, more dramatic texture.
It’s also fascinating how terminology can trip you up. US and UK crochet terms developed on different paths, so a "double crochet" in the US is a "treble crochet" in the UK! A pattern's instructions can look very different depending on where it’s from, so always check the pattern notes.
Actionable Tip: The best way to understand these variations is to make a small practice swatch. Grab some scrap yarn and just play! Try making clusters of different sizes and heights to see and feel the difference for yourself.
This kind of playful experimentation is what mindful crafting is all about—it's how you develop your own creative voice, one stitch at a time.
Getting the Hang of the Cluster Stitch
Once you get into the rhythm of making cluster stitches, you might find a few questions popping into your head. Don't worry, you're not the first! Let's clear up some of the most common hangups so you can keep crocheting with confidence.
One of the first things that trips people up is simply how to count their stitches. It looks a little confusing at first glance, but I promise it's more straightforward than you think.
How Do I Count My Stitches?
Even though you’re making several partial stitches (like three half-finished double crochets) to form a single cluster, the entire group counts as one single stitch. That's the golden rule.
When you peek at the top of your row, you’ll see the little 'V' created when you pulled your hook through all the loops at once. That 'V' is the one and only stitch you need to work into on the next row. Thinking of it this way is the key to keeping your stitch count right and your edges nice and straight.
Clusters vs. Bobbles vs. Puffs
It's so easy to get these wonderfully textured stitches mixed up! They're all part of the same creative family, but each has its own distinct personality.
Here's a quick way to tell them apart:
- Cluster Stitch: You work several partial stitches into the same space and then join them all together at the top. This creates a textured bump that's nicely integrated into the fabric.
- Bobble Stitch: This one is worked similarly, but you turn your work to complete it, which makes the stitch "pop" out dramatically on one side.
- Puff Stitch: For this stitch, you loop the yarn over your hook multiple times before pulling through. This creates a much softer, more rounded, and "puffed" up texture.
Learning how to crochet cluster stitch is a fantastic skill to add to your toolbox. With each puff you create, you're not just making fabric; you're weaving a little bit of joy and calm into your day.


![The Ultimate Beginner's Guide to Crochet [2026]](http://crochetree.com/cdn/shop/articles/feat-ultimate-beginners-guide-to-crochet_eae81cec-84d0-455d-b190-08cd22d826c4.jpg?v=1777713815&width=533)


