

The yarn over, often abbreviated as YO, is the single most important movement in all of crochet. Think of it as the foundational heartbeat that makes every stitch possible, from the simplest chain to the most intricate lace. It's just a quick, simple wrap of yarn over your hook, but mastering this one move unlocks your creative potential and truly begins your crochet journey.
This small action is your first step toward mindful crafting, a moment to connect with your hands, your materials, and the quiet joy of making something new.
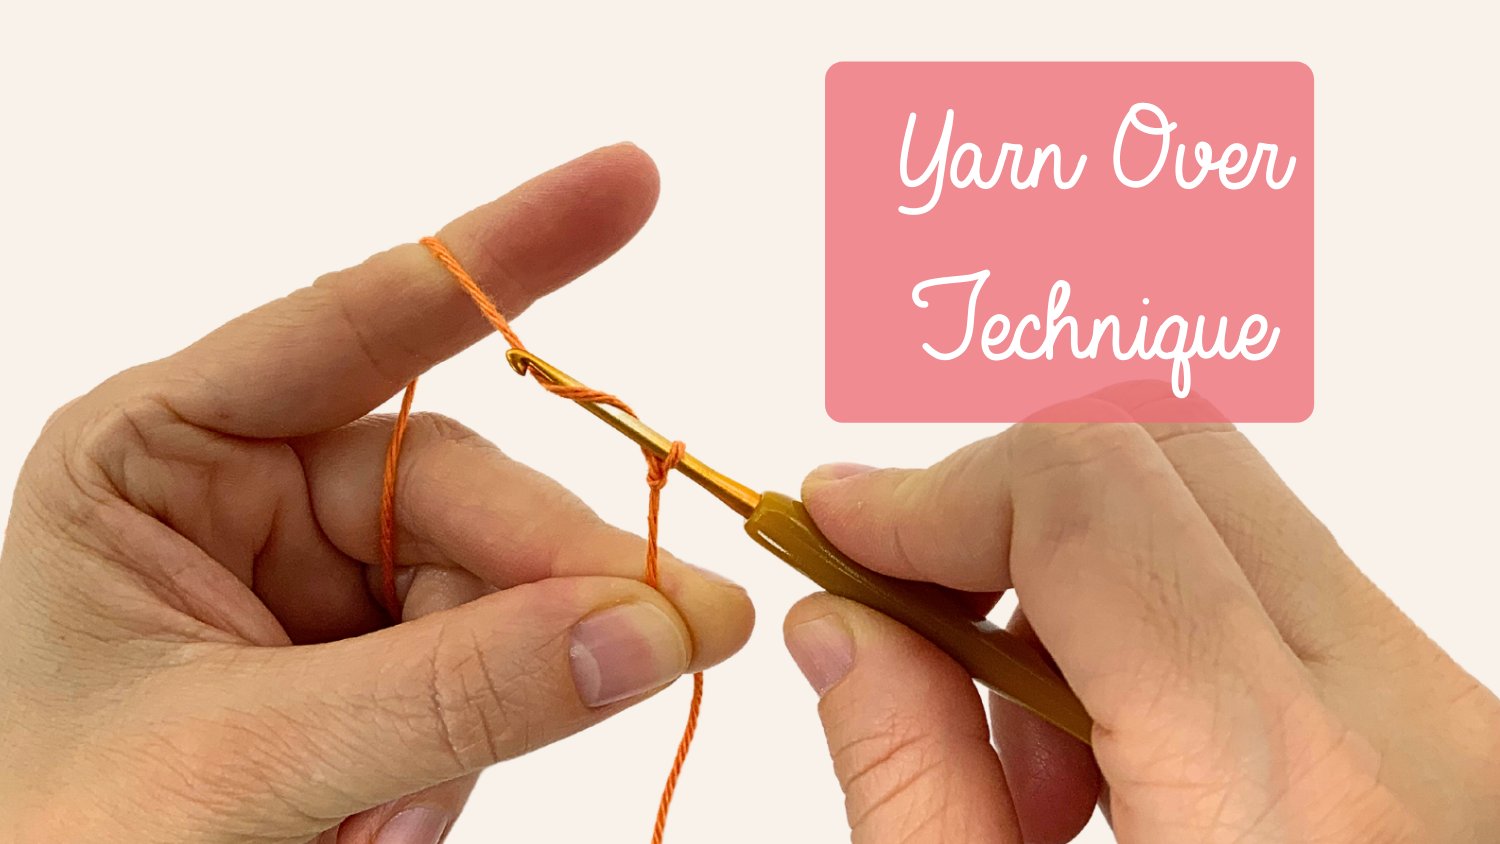
What is a Yarn Over in Crochet?
At its core, a yarn over is exactly what it sounds like: the physical act of wrapping your working yarn over your crochet hook. You'll do this thousands of times. It’s this single motion that allows you to grab the yarn and pull a new loop through an existing one, which is the literal definition of how a crochet stitch is made. Without it, you can't make a single crochet, a double crochet, or anything in between.
But the yarn over is more than just a mechanical step, it’s the heart of your crochet rhythm. Once you get the hang of it, you'll be able to:
Build Your Stitches: Every time you yarn over and pull through, you're adding height and structure to a stitch.
Create Different Textures: How you perform a yarn over can completely change the look of your fabric, giving you anything from dense, solid stitches to light and airy lace.
Crochet with Confidence: When this motion becomes muscle memory, you stop thinking about the "how" and can finally relax into the creative flow.
How to Perform the Perfect Yarn Over
Let’s walk through the yarn over in crochet together. Think of it as a simple, fluid dance between your yarn and your hook, a fundamental motion we want to feel as natural and comforting as a warm hug.
The goal here is to build muscle memory. Pretty soon, this movement will become a relaxing, automatic part of your crafting rhythm, something you do without a second thought, letting you focus on the simple joy of creating.
The Classic Yarn Over Motion
This is the most common way you'll see a yarn over done. It's the standard for the vast majority of crochet stitches and is responsible for creating those lovely, classic 'V' shapes in your fabric.
Before you start, make sure you’re holding your tools comfortably. How you position your hands plays a huge role in creating smooth, even stitches and avoiding strain. If you're unsure, our beginner-friendly tutorial on how to hold your crochet hook and yarn is a great place to start.
Once you’re ready, the motion is simple: bring the yarn from behind your hook, wrap it over the top, and let it settle in the front. Imagine your hook is reaching back to give the yarn a little hug.
An Alternative: The Yarn Under
You might also hear about the "yarn under." While less common for everyday projects, it’s a popular technique in amigurumi because it creates a much denser fabric. Instead of wrapping the yarn over the hook, you bring the hook over the yarn to grab it from underneath.
This subtle change produces a tighter stitch that looks more like an 'X' than a 'V'. It can feel a bit awkward at first, but it's a fantastic trick to have in your crafting toolkit, especially if you plan to make toys where you don’t want any stuffing peeking through.
A Gentle Reminder: There's no single "right" way to crochet. The best method is whatever feels comfortable for you and gives you a result you love. Your crafting journey is uniquely yours.
Tips for a Flawless Flow
Building a smooth yarn over habit from the start will make every project more enjoyable. Here are a few actionable tips to practice right away:
Relax Your Wrist: Avoid stiff, jerky motions. Let your wrist do most of the work with a gentle, fluid rotation. This not only prevents hand fatigue but also keeps your movements efficient.
Find Your Tension Sweet Spot: Your yarn should glide easily, not fight you. If your loops are too tight, you’ll struggle to pull the hook through. Too loose, and your stitches will be uneven. Aim for a relaxed, consistent hold.
Scoop, Don't Snag: Think of the hook’s movement as a gentle scoop rather than a sharp snag. This helps prevent splitting the yarn, which is what happens when your hook pokes through the strands instead of going cleanly around them.
How a Single Motion Builds Every Stitch
Once you get the hang of that graceful yarn over in crochet, you've unlocked the secret to everything else. This is where the magic really happens, you're about to see how this one simple movement is the key ingredient in every stitch you'll ever make, turning that single wrap into beautiful, textured fabric. It's the moment the "how" clicks with the "why," and your confidence will soar.
Seriously, this one motion is the foundation. Think of it like a single note in a song; one note is just a sound, but combining them creates a melody. In the same way, every crochet stitch is just a different sequence of yarn overs and hook movements. Once you see that pattern, stitch instructions stop looking like a foreign language and start feeling more like a simple recipe you already know.
From Simple to Tall Stitches
The height and texture of any stitch come down to one thing: how many times you yarn over. It’s that simple. A short, dense stitch like a single crochet uses the YO sparingly, while a tall, airy stitch like the double crochet piles them on.
Let's break it down:
Single Crochet (sc): This is your shortest, most basic stitch. You insert the hook, yarn over once to pull up a loop, then yarn over one last time to pull through the two loops on your hook.
Half Double Crochet (hdc): Ready for a little more height? This time, you start with a yarn over before your hook ever touches the fabric.
Double Crochet (dc): A fan favorite for a reason! This stitch gets even taller by starting with a yarn over and adding another one mid-stitch.
Grasping this connection is your ticket to reading patterns without stress. You’ll quickly realize a pattern isn't asking you to learn a dozen new things. It’s just asking you to use the one move you've already mastered in a slightly different order.
Yarn Over Count in Common Crochet Stitches
To make this crystal clear, here's a quick reference table. It shows how many times you'll yarn over at the beginning of some of the most foundational crochet stitches. This is your cheat sheet for understanding how stitches are built from the ground up.
|
Stitch Name (US Terms) |
Starting Yarn Overs |
Resulting Stitch Height |
|---|---|---|
|
Single Crochet |
0 |
Shortest |
|
Half Double Crochet |
1 |
Medium-Short |
|
Double Crochet |
1 |
Medium-Tall |
|
Treble Crochet |
2 |
Tall |
As you can see, the taller the stitch, the more yarn overs you do at the beginning. Once you remember this simple rule, you'll be able to predict how a stitch will look just by its name.
Common Yarn Over Mistakes and How to Fix Them
Every single crafter hits a few bumps in the road, and that's perfectly okay. Hitting a little snag is just a sign that you’re learning something new. Think of these moments not as mistakes, but as gentle nudges showing you what to try next. While the **yarn over in crochet** is a simple motion, a few common issues can definitely pop up.
One of the most frequent hurdles is accidentally splitting the yarn. This is when your hook pokes right through the strands of yarn instead of grabbing the whole thing cleanly. It can leave your stitches looking a bit messy and can even weaken the fabric.
Another classic mix-up is unintentionally doing a yarn under instead of a yarn over. A yarn under involves grabbing the yarn from beneath, which creates a tighter, twisted stitch that looks more like an 'X'. It’s a fantastic technique for amigurumi when you want a dense fabric, but it’s different from the traditional 'V' stitch created by a standard yarn over.
Finding Your Perfect Flow
If you find yourself running into these little challenges, don't get frustrated! A small adjustment is usually all it takes to get back on track. Your crafting time should feel joyful and relaxing.
Here are a few simple fixes you can try right away:
For Splitting Yarn: Try changing how you angle your hook. Instead of poking straight at the yarn, think of it more like a gentle scooping motion. Sometimes, just switching to a hook with a rounder, less pointy head can make a world of difference.
For Accidental Yarn Unders: Slow down for a moment and really watch the motion. Consciously bring the yarn from the back, wrap it over the top of the hook, and let it rest in the front. It’s all about building that muscle memory.
For Loops That Are Too Tight or Loose: Tension is a journey, not a destination. If your loops are too tight to work with, consciously relax your grip on both the yarn and the hook. If they’re floppy and loose, try holding the yarn a little more snugly as it feeds through your fingers.
Remember, this is all part of the process. Every crocheter, no matter how skilled they are now, has gone through this exact learning curve. Be patient with yourself and celebrate those small wins along the way.
Choosing the Right Yarn for Your Practice
Picking the right materials can make your learning journey so much smoother and more enjoyable. While technically any yarn will work for practicing a yarn over in crochet, some choices just make it easier to see what you’re doing and build confidence right from the start.
For beginners, a smooth, light-colored worsted weight yarn is a wonderful starting point. The thicker strand is easy to hold, and the light color lets you clearly see every single loop and stitch. That kind of visibility is a huge help as you train your hands and eyes to work together.
Your Questions About the Yarn Over Answered
As you get the hang of the yarn over in crochet, you're bound to run into a few questions. That’s totally normal! Here are some quick answers to the common snags crafters face, so you can keep your projects moving along smoothly and joyfully.
What Is the Difference Between a Yarn Over and a Yarn Under?
This is a great question, and the answer can really change the look of your fabric.
A yarn over (YO) is the classic move: you wrap the yarn over the top of your hook, moving from the back to the front. This creates the traditional 'v' shaped stitch that most crochet patterns use.
A yarn under (YU) is a bit different. Instead of wrapping, you grab the yarn with your hook from underneath. While they both get a loop on your hook, the YU method creates a tighter, slightly twisted stitch that looks more like an 'x'. It’s a favorite for amigurumi because it creates a denser fabric that holds stuffing in perfectly.
Why Is My Yarn Splitting?
Oh, yarn splitting can be so frustrating, but it's usually an easy fix! It typically happens for one of two reasons: the yarn itself or your tools.
Some yarns are just more prone to splitting, especially if they are loosely plied. But often, the culprit is a pointy hook that pokes right through the strands instead of scooping them up cleanly.
If you find your yarn is splitting a lot, try switching to a hook with a rounder, smoother head. It also helps to focus on a gentle, scooping motion rather than a sharp jab. This small adjustment can make a huge difference and bring the ease back into your crafting.
With each loop and stitch, you are not just making an object, you are creating a moment of peace for yourself. Keep practicing, be kind to yourself, and enjoy the beautiful process of turning a simple string into something wonderful. Happy crocheting!


![The Ultimate Beginner's Guide to Crochet [2026]](http://crochetree.com/cdn/shop/articles/feat-ultimate-beginners-guide-to-crochet_eae81cec-84d0-455d-b190-08cd22d826c4.jpg?v=1777713815&width=533)


