
Learning to read a crochet pattern is like learning a new, exciting language. You start by decoding the essential info at the top: the skill level, the materials list, and the gauge swatch. Think of these as your project's blueprint, they set you up for success before you even pick up your hook. Getting this part right is the first step to making something that looks just like the picture, and you can absolutely do it!
Your First Look at a Crochet Pattern
So, you're ready to dive into the world of crochet! When you first open a pattern, it can feel like you're trying to crack a secret code. Trust me, we’ve all been there. But once you get the hang of it, you'll see it's a wonderfully creative language that lets you turn a single strand of yarn into something truly magical. The key is to take it one step at a time.
Understanding the standardized abbreviations and symbols is what allows you to follow a designer's vision and bring it to life. This universal shorthand, which became common around the 1950s, is what makes it possible for crocheters all over the world to share and create from the same patterns.
The Anatomy of a Pattern's First Pages or Introduction
Before you get lost in the stitches, take a moment to look at the introduction of the pattern. This section is your pre-flight checklist, and it has all the critical details you need for a smooth journey. Let's break down what you'll find there.
To give you a clearer picture, here’s a quick rundown of what those key terms mean, especially when you're making amigurumi.
Quick Guide to Pattern Essentials
|
Pattern Element |
What It Means for You |
Why It's Critical for Amigurumi |
|---|---|---|
|
General Information |
It contains important information about the stitches you are going to use, crochet hooks, and abbreviations. |
This section prepares you to read the pattern smoothly. |
|
Materials List |
The exact yarn, hook size, and extras like safety eyes or stuffing you’ll need. |
Ensures your doll comes out the right size with the intended look and feel. |
|
Gauge |
A small test swatch to check if your stitch size matches the designer’s. |
Accurate gauge measurement becomes particularly important when creating garments. While not all amigurumi doll or animal patterns provide specific gauge details, they typically recommend a particular yarn weight and crochet hook size. If your gauge varies from the designer's, the resulting doll may differ in size, being either slightly larger or smaller than intended. |
Choosing the Right Yarn for Amigurumi
When we design our amigurumi dolls, we almost always call for 100% mercerized cotton yarn in a fingering weight. This isn't just a personal preference; it's a strategic choice for getting that classic amigurumi look that we know you'll love creating.
The mercerization process gives the cotton a gorgeous sheen, makes it stronger, and helps prevent it from splitting while you work. Plus, the fingering weight is perfect for creating those small, detailed dolls with crisp stitch definition. It’s what helps you get that tight, seamless fabric that makes amigurumi so charming and professional-looking.
Once you have the right materials, you can focus on mastering the basic crochet stitches that will bring your doll to life.
Decoding Crochet Abbreviations and Terms
Okay, you’ve scanned the pattern's vitals: yarn weight, hook size, all that good stuff. Now it’s time to dive into the core instructions, which can look like a secret code at first glance. Don't let it intimidate you! All those letters and symbols are simply the language of crochet, dictating every single stitch you'll make. Learning to speak it is how you turn a ball of yarn into something amazing.
But don't feel like you have to memorize a whole new dictionary overnight! Nearly every well-written pattern includes a glossary of the abbreviations it uses. My first move is always to find that list.
The Building Blocks of Amigurumi
When you're making amigurumi, you'll see a handful of abbreviations pop up constantly. These are the fundamental stitches that create the tight, dense fabric we need for our dolls so the stuffing doesn't peek through. I like to think of each one not just as a shorthand word, but as a physical command for my hook and yarn.
Getting what these terms mean is step one, but seeing how they work together is where the magic really happens. We get into the nitty-gritty of how these stitches form the basis of all amigurumi in our guide on mastering the art of reading crochet patterns.
For now, let's get you familiar with the most common terms you'll bump into right away.
Common Amigurumi Crochet Abbreviations
To get you started, I've put together a quick-reference chart for the abbreviations you'll see in almost every amigurumi pattern. These are the absolute essentials for creating those classic sculpted shapes. Feel free to screenshot this or keep it open in a tab, it's your cheat sheet to success!
|
Abbreviation (US) |
Full Term |
What It Does |
|---|---|---|
|
mr |
Magic Ring |
Creates a tightly closed circle, which is the starting point for most amigurumi pieces. This is crucial for avoiding a hole at the top of a doll's head. |
|
sc |
Single Crochet |
The most common stitch in amigurumi. It creates a short, dense stitch that builds a solid fabric, making sure no stuffing shows through. |
|
inc |
Increase |
This means you'll work two stitches into the same spot. It adds a stitch to your round, making the piece wider and helping create curves and flat circles. |
|
dec |
Decrease |
A technique for working two stitches together to remove one from your count. It makes the piece narrower. |
This little chart is your best friend when you're just starting out. Keep it handy, and soon enough, these abbreviations will become second nature.
Understanding the Rhythm of a Pattern
Beyond single stitches, patterns use a kind of shorthand to describe repeating sequences. This is where you find the real rhythm of crochet. You’ll often see instructions written out like this:
Example Round: (sc, inc) x 6
This simple-looking line is a powerful instruction. Let's break it down piece by piece:
The Parentheses (): These group a set of stitches that belong together. Here, the sequence is "one single crochet, then one increase."
The Multiplier x 6: This tells you how many times to repeat the sequence inside the parentheses. In this case, you'd work that (sc, inc) pattern a total of six times to finish the round.
So, when you see (sc, inc) x 6, what you're actually doing is: sc, inc, sc, inc, sc, inc, sc, inc, sc, inc, sc, inc.
Once you learn to spot these repeating sequences, following a pattern feels so much more intuitive. You'll start to see the logic behind the shapes you're creating, moving from just following steps to truly understanding the craft.
Mastering Repeats with Brackets and Asterisks
Alright, this is the part where some patterns can start to look a little intimidating. I get it! But trust me, we can break it down. Think of brackets, parentheses, and asterisks as the punctuation of crochet, they organize stitches into tidy little phrases, telling you exactly what to repeat and when.
Getting a handle on these symbols is what really unlocks the door to more complex and beautifully shaped projects. It's how you go from just following steps to truly understanding the why behind the perfect curve of an amigurumi head or the gentle shape of a tiny arm. You’ve totally got this!
The Role of Parentheses and Brackets
In most amigurumi patterns, you’ll see parentheses ( ) or square brackets [ ] used to group a sequence of stitches together. Their job is simple: to tell you "this is the chunk you need to repeat."
Let's look at a super common line from a typical amigurumi pattern:
Rnd 4: (sc in next 2 sts, inc) x 6. [24]
Here’s how to read that instruction:
(sc in next 2 sts, inc): This is your core set of actions. You’ll single crochet in the next two stitches, then work an increase in the stitch right after that.
x 6: This is your multiplier. It tells you to repeat that whole sequence inside the brackets a total of six times as you work your way around the piece.
[24]: This number is your best friend! It's the final stitch count for the round, perfect for a quick check to make sure you're on track.
When you follow this, you're creating a steady, rhythmic pattern that spreads the increases out evenly. It's the secret to making a perfect, flat circle instead of a wonky cone.
When Asterisks Come into Play
Asterisks * do a similar job, but designers often use them to mark off bigger or more complex repeating sections inside a single round. You might run into something that looks like this:
sc in next 5 sts, *sc in next st, inc*. Repeat from * to * 4 more times.
This format isolates just the repeating part of the round. You’ll work those first five single crochets just once at the beginning. Then, you hit the first asterisk and start the repeating part: sc, inc. You'll do that sequence a total of five times (the first one, plus the "4 more times"). Just think of the asterisks as bookends for the section you're supposed to loop.
Pro Tip: Reading patterns like this is a skill that just gets easier with practice.
These symbols are your roadmap. They make sure your increases and decreases land in the right spots, giving your project the structure and shape it needs to come to life. Before you know it, you'll be reading these sequences as easily as you read this sentence.
Visualizing Patterns with Crochet Charts
If you're a visual learner, get ready to meet your new best friend: the crochet chart. While written instructions tell you what to do, charts actually show you. They’re basically a language-independent map of your project, and learning to read them is a fantastic skill to add to your crafting toolkit.
Think of a crochet chart as a bird's-eye view of your work. Every symbol on the chart represents a specific stitch, giving you a crystal-clear picture of how everything fits together. This is a game-changer for amigurumi projects, which are worked in continuous rounds.
Reading Charts in the Round
Unlike patterns worked in flat rows that go back and forth, amigurumi charts are circular. You read them from the center outward. Your journey begins right at the core with the starting chain or magic ring, and each round spirals out from there, building on the last.
You'll follow the chart in a counter-clockwise direction, just like you crochet. This layout makes it incredibly easy to see exactly where your increases or decreases need to go. Instead of trying to decipher a dense line of text, you can physically see the clusters of stitches that create the shaping for a perfectly round head or a completely flat base.
One of the best things about charts is their universality. A single chart can be understood by crocheters all over the world, no matter what language they speak. It’s a truly global way to share the joy of making.
Charts vs Written Patterns
So, which is better? A chart or written instructions? Honestly, they both have their strengths. The best crocheters I know learn to use them together.
Here’s a quick rundown:
Written Patterns: These are great for providing detailed notes, instructions for color changes, and specific techniques that are tough to show in a chart. They are linear and easy to follow step-by-step.
Crochet Charts: These are unbeatable for showing stitch placement and the overall structure of a piece at a glance. It's often much quicker to spot a mistake on a chart than by re-reading lines of abbreviations.
Learning to read a crochet pattern in chart form builds your confidence and deepens your understanding of how stitches create 3D shapes. You'll start to see the logic behind the design, which empowers you to take on even more exciting and complex projects.
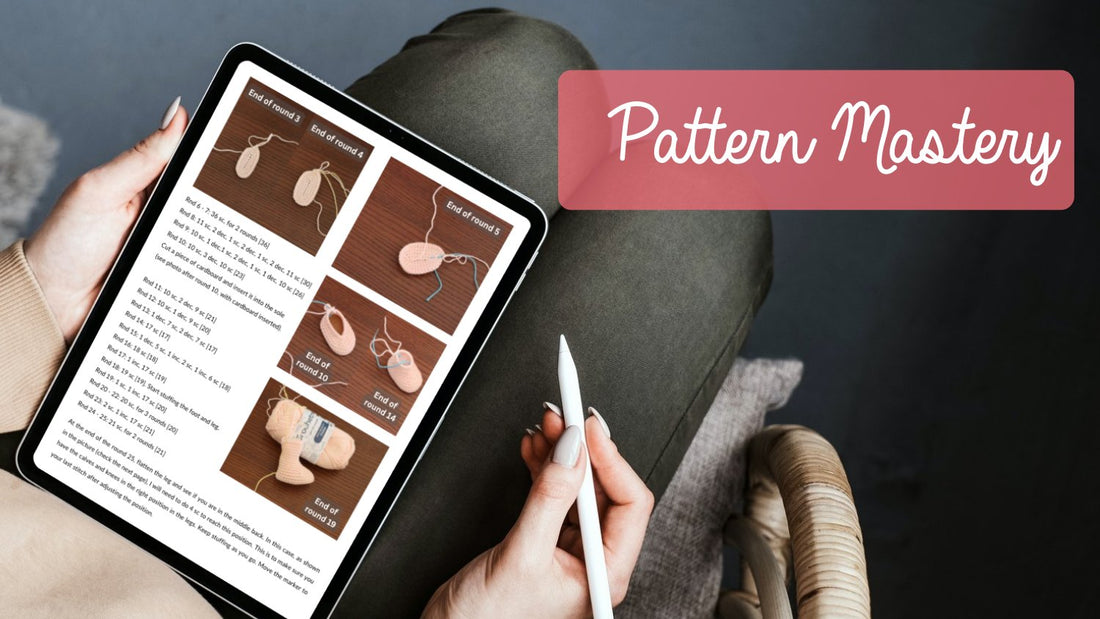
Putting Your New Skills into Practice
Alright, this is where it all starts to click. We've gone over the individual pieces, and now it's time to see how they come together in a real pattern. Think of this as your first guided practice round, where we turn that line of text into confident, flowing stitches.
You've learned the language; now let's start speaking it. This is exactly how a simple skein of 100% mercerized cotton yarn becomes a gorgeous, handcrafted amigurumi doll. Just remember, every expert crocheter you admire started right here, figuring out one round at a time. You can absolutely do this.
A Practical Walkthrough of a Pattern Line
Let's pull apart a super common line you’ll find in almost any amigurumi pattern. This one is a classic for making a flat circle, like the top of a doll's head.
Rnd 4: (sc in next 2 sts, inc) x 6 [24] or Rnd 4: (2 sc, 1 inc) 6 times [24]
At first glance, it can still look a little cryptic. But we have all the tools we need to translate it. Let's break it down, step-by-step.
- Rnd 4: This is easy, it just tells you you're working on the fourth round of your project.
- (sc in next 2 sts, inc) or (2 sc, 1 inc): This is your core repeatable sequence. It means you'll single crochet in the next stitch, then single crochet in the one after that, and finally work an increase (which is two single crochets) into the third stitch. So, it's a "sc, sc, inc" pattern.
- x 6: The parentheses tell you what to repeat, and this part tells you how many times. You'll work that "sc, sc, inc" sequence a total of six times to get all the way around your circle.
- [24]: This little number is your best friend. It's your stitch count, and it's the perfect way to check your work. After you finish the round, count your stitches. If you have 24, you're golden. If you have 23 or 25, you know a little slip-up happened, and it's so much easier to go back and fix it right away.
This simple infographic gives you a great visual for how to approach any new pattern.
As you can see, the flow is always the same: identify the abbreviations, double-check your gauge, and then follow the sequence. It’s a reliable process you can count on every single time.
Understanding Finishing Instructions
Once all the shaping is done and your piece is complete, the pattern will give you finishing instructions. Don't skip these! They're just as crucial as the stitches themselves.
You’ll often see something like, “Fasten off and leave a long tail for sewing.” This just means you'll cut your yarn, leaving a generous amount (I usually go for 12-18 inches), and pull that tail all the way through your final loop to lock it in place. That long tail is what you'll use later to neatly sew the finished piece onto another part of your doll.
As you build these foundational skills, you might be itching for more guidance. For anyone just starting out, our article on how to start crocheting is a perfect next step on your creative journey.
Common Questions About Reading Patterns
As you dive into this wonderful craft, you’re bound to have questions. Don't worry, that’s a completely normal part of learning! Every single crocheter has been there. Think of these common hurdles not as roadblocks, but as milestones that deepen your understanding.
You’re not just learning to follow instructions; you’re building a foundation for a lifetime of creativity. Let’s tackle some of the most frequent questions we hear so you can keep your momentum going and your spirits high.
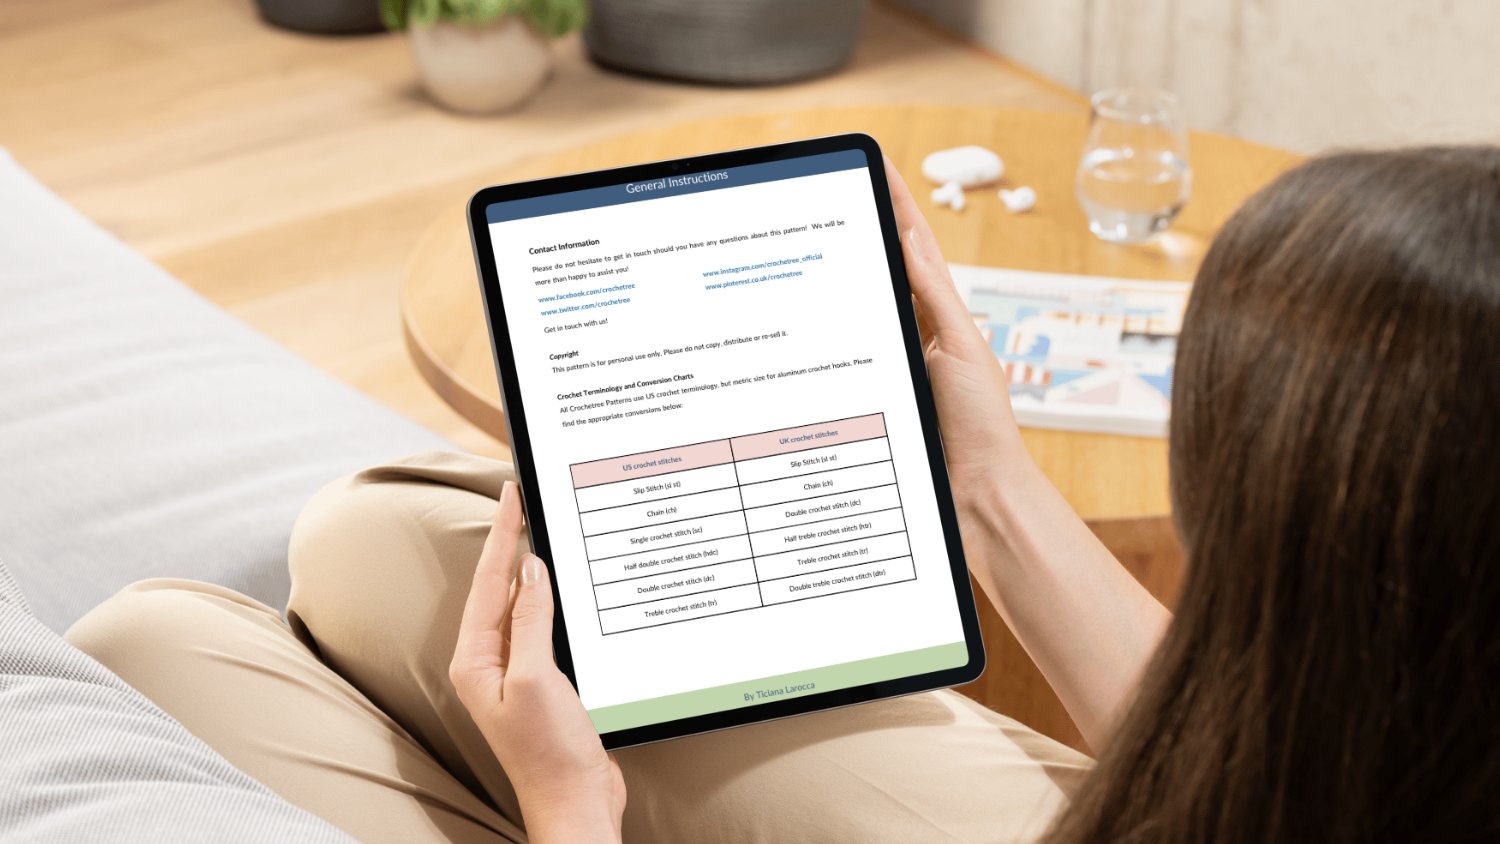
What Is the Difference Between US and UK Crochet Terms
This is, without a doubt, one of the biggest points of confusion for new crocheters! The main thing to remember is that the stitch names are offset. For example, what we call a single crochet (sc) in US terms is known as a double crochet (dc) in UK terms. Following that logic, a US double crochet (dc) becomes a UK treble crochet (tr).
Most patterns will state which terminology they’re using right at the beginning. If a pattern doesn't specify, you'll have to play detective. Amigurumi almost exclusively uses single crochet as its primary stitch. So, if you see "dc" listed as the main stitch for a little doll, it's a huge clue that you're looking at a UK pattern.
My Stitch Count Is Wrong What Should I Do
First off, take a deep breath. This happens to literally everyone, even the most seasoned pros! The most important thing is not to panic. Carefully go back and recount the stitches in the round you just finished.
If the number is still off, the best solution is to "frog" it (a cute term for rip-it, rip-it!) back to the start of that round and try again.
Trust me on this: It is always easier to fix a mistake on the current round than to try and compensate for it in later rounds. Using a stitch marker in the first (or last) stitch of every single round is an absolute lifesaver. It makes counting so much easier and shows you exactly where each round begins and ends.


![The Ultimate Beginner's Guide to Crochet [2026]](http://crochetree.com/cdn/shop/articles/feat-ultimate-beginners-guide-to-crochet_eae81cec-84d0-455d-b190-08cd22d826c4.jpg?v=1777713815&width=533)


