

Before you can start creating charming amigurumi dolls, you have to get comfortable with your tools. Learning how to hold your crochet hook and yarn is the absolute foundation of your craft. It might sound basic, but an awkward grip can lead to inconsistent stitches and tired hands, turning a relaxing hobby into a frustrating chore.
But here's the secret: the goal isn't to find the one "right" way, but to discover your way. We're all built differently, and what feels perfect for one person might feel clumsy to another. Don't worry, you are on the right path! Finding your groove is just a matter of trying a couple of proven techniques and listening to what your hands tell you. You can do this!
Finding Your Natural Crochet Grip
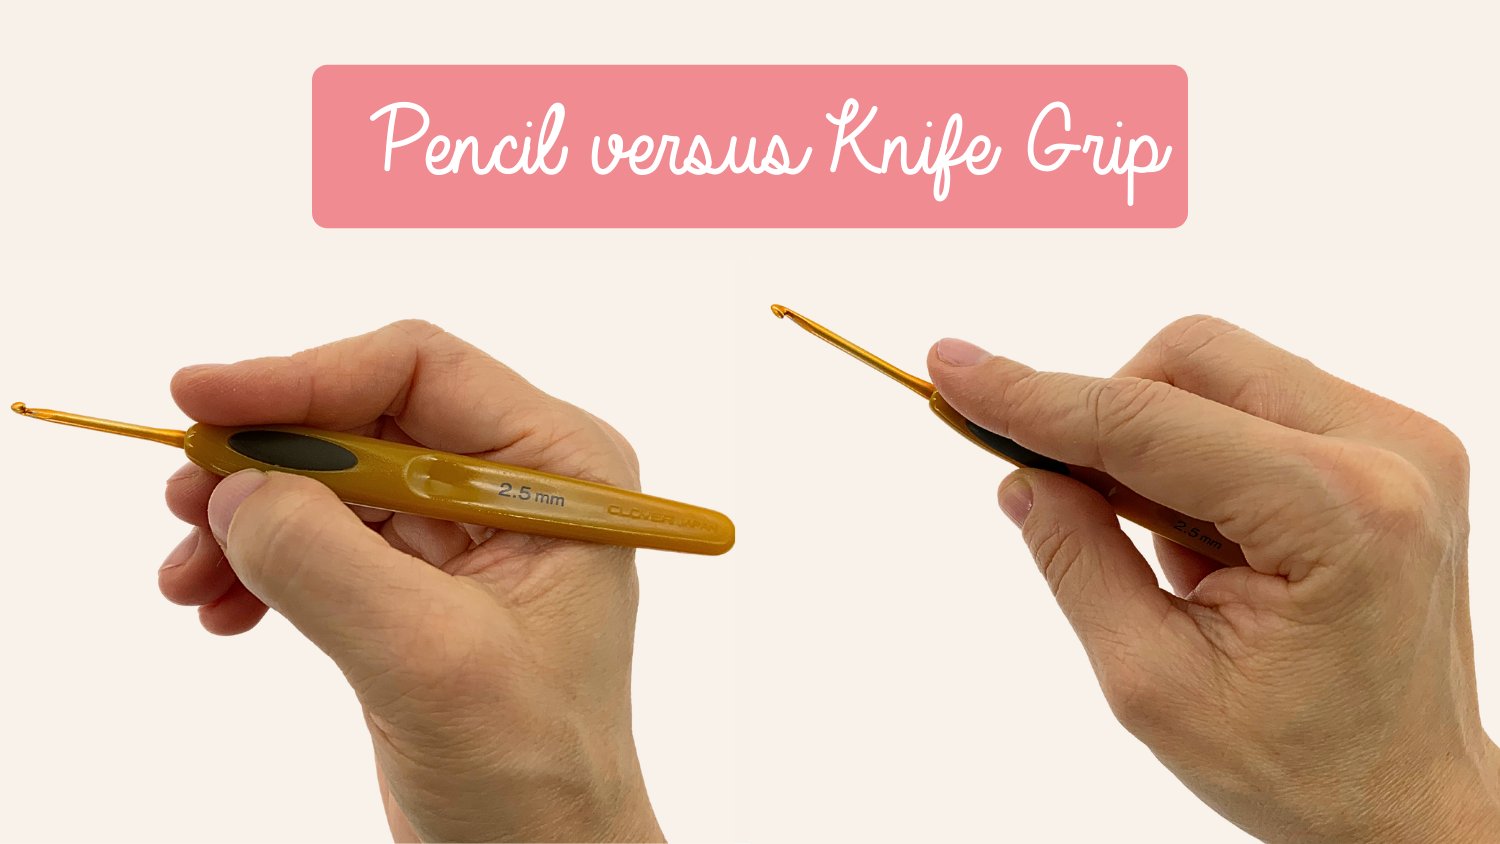
There are two main ways crocheters hold their hooks: the knife grip and the pencil grip. Think about it just like it sounds: one is like holding a dinner knife, and the other is like holding a pencil.
The way we hold our hooks has evolved over the years, but these two methods have stood the test of time. You can read more about the history of crochet tools on secretyarnery.com if you're curious!
With the pencil grip, the hook rests on top of your hand, guided by your thumb and index finger for really precise movements. On the flip side, the knife grip tucks the hook's handle into your palm, with your fingers wrapping over it for a sturdier, more powerful hold. Interestingly, the knife grip is reportedly the more popular of the two worldwide.
Which Crochet Hook Grip Is Right for You?
So, how do you choose? Honestly, your hands will tell you. It's all about what feels natural and lets you work without cramping up. To help you figure out where to start, here's a quick rundown of the two styles.
|
Grip Style |
How It Feels |
Best For |
|---|---|---|
|
Knife Grip |
Like holding a knife or a screwdriver. The handle rests in your palm. |
Crocheters who want a powerful, relaxed grip for long sessions. It often helps with even tension. |
|
Pencil Grip |
Like holding a pen or pencil to write. The hook rests on top of your hand. |
Those who prefer fine, detailed movements. It's a natural starting point if you're used to writing or drawing. |
Ultimately, there's no right or wrong answer. Many crocheters even switch between grips depending on the project or if their hands get tired. The best approach is to try both and see which one clicks.
Let's dive a little deeper into each one.
As you can see, the knife grip often gives people more consistent tension and less hand fatigue over long crochet sessions. However, the pencil grip can feel more intuitive at first, making that learning curve a bit smoother for some beginners. Your personal comfort is what matters most, so let's explore each style to find your perfect match.
The Knife Grip for Power and Comfort
Picture how you’d hold a small dinner knife. That’s the basic idea behind the knife grip, a really popular and powerful way to hold your crochet hook. Many crafters find this method is a lifesaver for long crochet sessions because you use your whole hand to move the hook, which takes a lot of strain off your fingers and wrist.
This grip is a total game-changer for amigurumi. When you're making those tight, uniform stitches to create a dense fabric, especially with a smooth, 100% mercerized cotton yarn in fingering weight, you need reliable control. The knife grip gives you the power to pull your yarn through consistently, ensuring none of that precious stuffing can peek through your finished dolls.
How to Position Your Hand
Let's get this grip sorted. It feels a lot more natural than it might sound, and with a little practice, you'll get the hang of it in no time. Ready to try?
The Main Hold: Let the hook rest in your palm, with the flat thumb rest sitting comfortably against the side of your index finger.
Your Guiding Fingers: Now, place your thumb right on top of that thumb rest. Your thumb and index finger become your steering wheel, guiding the tip of the hook exactly where you want it to go.
The Support System: Gently curl your other three fingers around the hook's handle. This creates a stable, relaxed base to work from.
This overhand grip brings the larger muscles in your hand and forearm into play, which is why it’s often much less tiring. You're essentially steering with your entire hand instead of just pinching with your fingertips.
This powerful hold can make a huge difference, but so can the hook you're using. Finding the right tool is just as crucial as your technique. If you're curious about what to look for, take a peek at our guide on how to choose the perfect crochet hook for your project.
Ultimately, the goal is to find a comfortable rhythm that makes crocheting feel like a joy, not a chore. You’ve got this!
The Pencil Grip for Precision and Detail
If the knife grip feels a little clumsy, the pencil grip might feel just right. This hold is exactly what it sounds like: you hold the hook just like you would a pen or pencil. It offers fantastic control and precision, making it a favorite for detailed work.
This is an amazing grip for amigurumi. When you’re crafting tiny, intricate shapes, this refined hold lets you guide the hook with incredible accuracy. It relies on your thumb and index finger for the delicate maneuvers, while your middle finger provides a steady base. If you're already comfortable with fine motor tasks like drawing or writing, this grip will probably feel very natural.
Finding Your Balance
Getting this grip right is all about finding a comfortable balance point. You don't need a death grip on the hook; in fact, a relaxed hold is the key to preventing hand strain and keeping your stitches beautifully even. Let's try it together.
Finger Placement: Gently pinch the flat thumb rest on your hook between your thumb and index finger.
The Support Finger: Let the barrel of the hook rest lightly against the side of your middle finger. Think of this finger as a stabilizing force that doesn't add any tension.
Relax Your Hand: Your ring and pinky fingers should curl naturally into your palm. They don’t need to do any work here, so just let them rest.
This underhand grip is perfect for making small, quick wrist movements, which is what helps you stitch both quickly and accurately. It’s the secret weapon for creating those perfectly sculpted amigurumi heads and limbs without any pesky gaps.
Practice Makes It Natural
Like any new skill, building muscle memory is everything. I always tell beginners to start by just making a long chain. Don't worry about how it looks. Instead, focus entirely on the feel of the hook in your hand and the rhythm of your movements. Pay close attention to how your fingers guide the hook through the yarn.
With a little bit of practice, holding your hook this way will start to feel like an effortless extension of your hand. That's when you'll unlock the precision needed to create some truly stunning pieces.
Mastering Yarn Tension for Flawless Stitches
Getting your hook grip right is only half the battle. The real magic happens when you learn how to hold your hook and yarn in perfect harmony. Think of consistent yarn tension as the secret ingredient for creating a smooth, professional-looking fabric.
Without it, your stitches can get a little wonky, either too loose and gappy or so tight they pucker the fabric. That's definitely something we want to avoid when crafting amigurumi. If you would like to read more about tension while crocheting, take a look our brand new eBook "Tight and Right: Mastering Crochet Tension".
The Most Common Yarn Hold
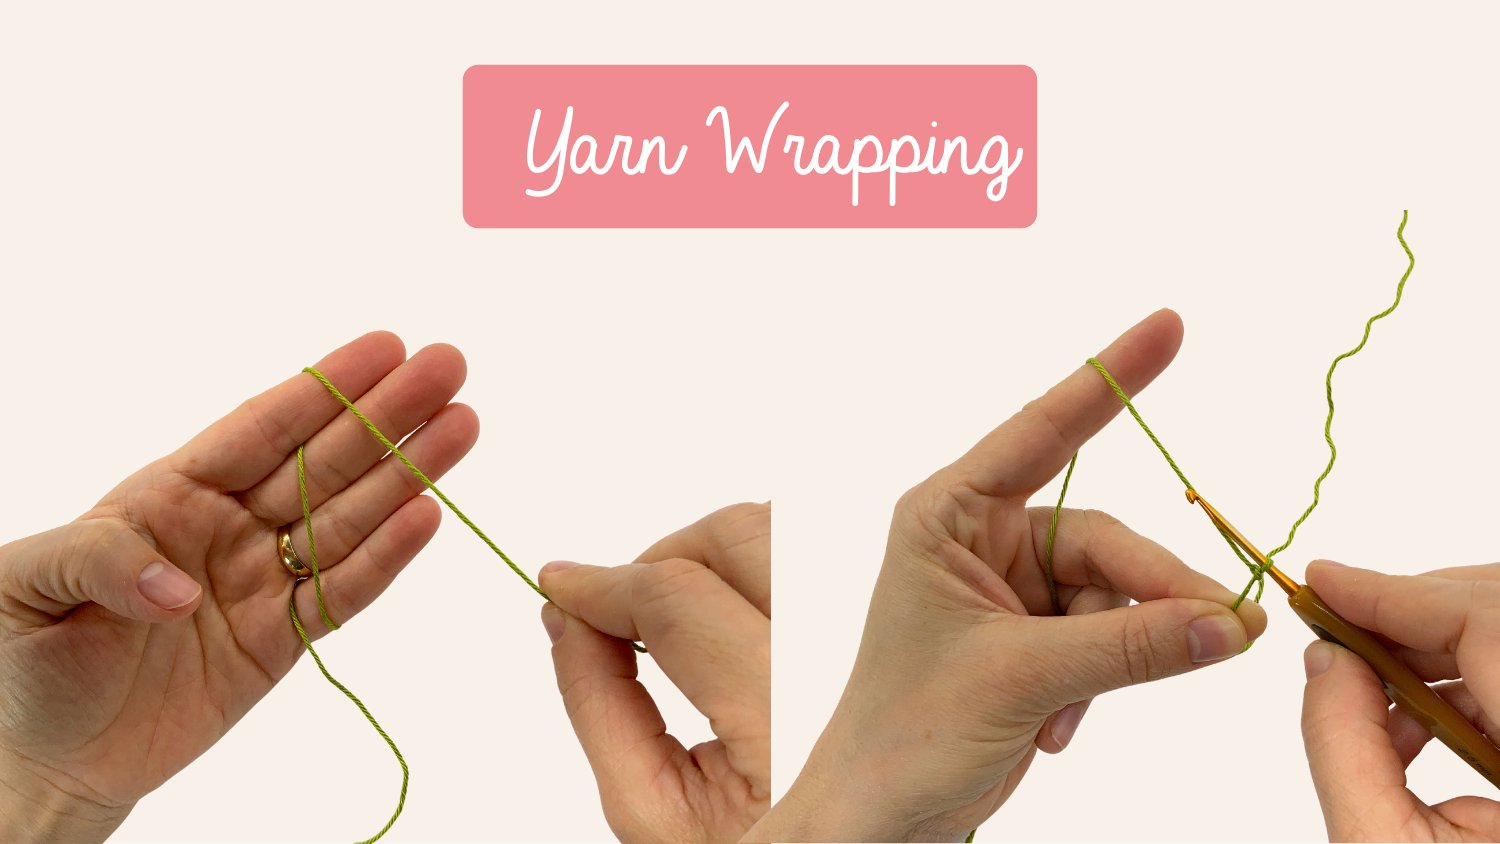
You'll find there are tons of ways to tension your yarn, but one method stands out as a reliable favorite for a reason. It involves a simple weave through the fingers of your non-dominant hand, the one that isn't holding the hook. Here’s an actionable way to try it right now:
The First Wrap: Start by weaving the yarn from back to front around your pinky finger. This little wrap acts as your first "brake," slowing down the yarn just enough as it comes off the ball or skein.
The Final Guide: From there, just bring the yarn up and over your index finger. Your index finger becomes the final guide, presenting the yarn perfectly to your hook for each stitch.
This simple setup turns your hand into a surprisingly effective tensioning tool. You can raise or lower your index finger to tweak how tightly the yarn feeds, or you can give a gentle squeeze with your pinky if you feel like you need more resistance for looser stitches.
There's a good reason this technique is so widely used. Many crocheters find wrapping the yarn around their pinky gives them superior control, helping them achieve more uniform stitches faster.
Troubleshooting Your Tension
Even with the perfect hold, finding your rhythm is all about practice. So if your tension feels off at first, don't get discouraged! It happens to everyone, and you are not alone in this.
If your stitches are coming out too tight, you might be clenching your fingers without realizing it. Try to consciously relax your hand and focus on letting the yarn glide smoothly.
On the other hand, if your stitches are too loose, try adding another wrap around your pinky or even your ring finger. This creates just a bit more drag on the yarn, tightening things up.
Developing that intuitive feel for yarn management is a huge milestone in your crochet journey. If you feel like you're struggling to get it right, please don't worry—it’s a very common hurdle. We have a whole guide on Tight and Right that can help. Just remember, every stitch is a step forward.
Bringing It All Together With Practice
You now have all the foundational pieces for holding your hook and yarn. So, what’s next? Simple: practice.
If it feels a bit clumsy and awkward at first, that’s completely normal. You’re teaching your hands to coordinate in a brand-new way, and it takes a little time before it clicks and becomes second nature.
The goal right now isn’t perfection. It’s all about muscle memory. Think of it as teaching your hands a new dance. Every stitch you make, no matter how wonky, is a step in the right direction. Be patient with yourself! Every expert crocheter you admire started exactly where you are, fumbling with their tools and wondering if they’d ever get it right. You are building a wonderful new skill.
Building Your Rhythm
The fastest way to get comfortable is through consistent, low-pressure practice. You don't need to dive into a complex amigurumi project right away. In fact, simple exercises are far more effective for building those core skills. Here are two actionable tips you can start today:
Make a really, really long chain. Seriously. Don't even bother counting. Just focus on the feeling of the yarn gliding through your fingers and the hook moving in and out. This is the absolute best way to get your hands working together in sync.
Practice in short bursts. Aim for just 10-15 minutes a day. This is much more effective for building lasting muscle memory than a single long, frustrating session. It also helps prevent your hands from getting sore.
Remember to check your posture! Sit up straight with your feet flat on the floor, and take frequent breaks to stretch your hands, wrists, and shoulders. Your body will thank you for it later!
Embrace the learning curve and celebrate the small wins. Each stitch that looks a little more even than the last one is genuine progress. You're teaching your hands an entirely new language, and before you know it, they’ll be creating beautiful things without you even having to think about it. You've got this!
Troubleshooting Common Crochet Grip Issues

So, you think you’re doing everything right, but something just feels… off. Don't worry, we've all been there. Hitting a few bumps like hand cramps or stitches that look a little uneven is a rite of passage for every crocheter. These aren't signs you're failing; they're just little nudges to help you refine your technique.
If your hands are cramping up, chances are your grip is way too tight. This is super common for beginners because you're concentrating so hard. Try to take a breath and consciously relax your fingers. Let the hook do the work. A death grip won't make your stitches any better, but it will definitely lead to sore hands.
Finding Your Comfort Zone
You'll quickly learn that hand pain and uneven stitches often go hand-in-hand. A relaxed hand is a steady hand, and that's the secret to figuring out how to hold a crochet hook and yarn in a way that works for you. Here are some things to try:
Switch Up Your Grip: Have you been using the pencil grip? Give the knife grip a try for a bit, or vice versa. Sometimes, just changing positions is all your hand muscles need to relax.
Check Your Posture: It’s easy to forget, but slouching puts a surprising amount of strain on your neck and shoulders, which can travel right down to your hands. Sit up straight, and don't forget to take regular stretch breaks!
Let the Yarn Flow: Uneven stitches are almost always a sign of inconsistent yarn tension. Make sure your yarn is flowing freely off the skein and not snagging on anything. A smooth glide is everything when it comes to uniform stitches.
Small adjustments can make a world of difference. If something feels wrong, it probably is. Listen to your body and don’t be afraid to experiment until you find what feels comfortable and sustainable.
Remember, comfort is the key to enjoying crochet for years to come. You're building a new skill, and finding your personal rhythm is all about trial and error. Be patient and kind to your hands, they're learning, too.
Frequently Asked Questions
Even with the best instructions in hand, it's completely normal for a few questions to pop up as you’re getting the feel for your hook and yarn. Let’s dive into a couple of the most common ones I hear from new crocheters.
Is One Grip Better Than Another?
Honestly, no. There’s no single “best” way to hold your hook. Think of it like handwriting, everyone develops their own comfortable style.
The knife grip is often a favorite among those who crochet for hours at a time, as it can help with speed and reduce fatigue. This is the one we use at Crochetree most of the time. On the other hand, the pencil grip can offer incredible precision, which is a huge plus for detailed projects like amigurumi. The most important thing is your comfort, so experiment and stick with what feels right for you.
Why Do My Hands Hurt?
If your hands are cramping or aching, it’s almost always a sign that you’re holding your hook and yarn too tightly. This is one of the most common hurdles for beginners: when you’re concentrating so hard on getting the stitches right, it’s easy to tense up without realizing it.
Remember to take frequent breaks. Put down your project, wiggle your fingers, and consciously relax your grip. Crocheting should be a soothing, comfortable activity, not a painful one!
A relaxed grip is key to preventing strain and achieving beautiful, even stitches. If your hands are cramping, take a moment to breathe, shake them out, and loosen your hold on your tools and yarn.
Learning to manage your tension is just part of the journey, and it’s one of the many reasons crochet is good for you and how to get started. It teaches you to be mindful of both your craft and your body.


